How To Make Your Own Plugin#
The Open Ephys GUI was designed to be extended via plugins that can be developed and shared independently of the main application. This is the primary way in which end users are encouraged to add new functionality to the GUI.
This tutorial will guide you through the steps involved in making a plugin from scratch. At the end, you will have created a “TTL Event Generator” plugin, which can emit TTL events when a button is pressed, or continuously at a customizable interval. TTL events represent on/off transitions that are traditionally associated with “Transistor-Transistor Logic” circuits. Within the Open Ephys GUI, TTL events are used to represent state transitions on both physical and virtual “lines.” Each TTL channel can track the state of up to 256 lines, but for simplicity our plugin will only use the first 8 lines.
Along with explaining how to configure the plugin and set up the main process() method, this tutorial will demonstrate how to create UI components for the plugin using the GUI’s built-in parameter editors.
If you get stuck, you can take a look at the finished plugin source code here to see if your version matches: open-ephys-plugins/ttl-event-generator
Important
These instructions assume you have already compiled the main application from source. If not, you should start by following the instructions on this page.
Creating a new plugin repository#
The first step in creating a plugin is to create a new code repository from a template. There are five different types of plugins that include pre-defined templates: Processor Plugins, Visualizer Plugins, Data Threads, Record Engines, and File Sources. Since in this case we are creating a plugin that processes data, but does not include a separate canvas for visualization, we will use the Processor Plugin template:
Log in to your GitHub account.
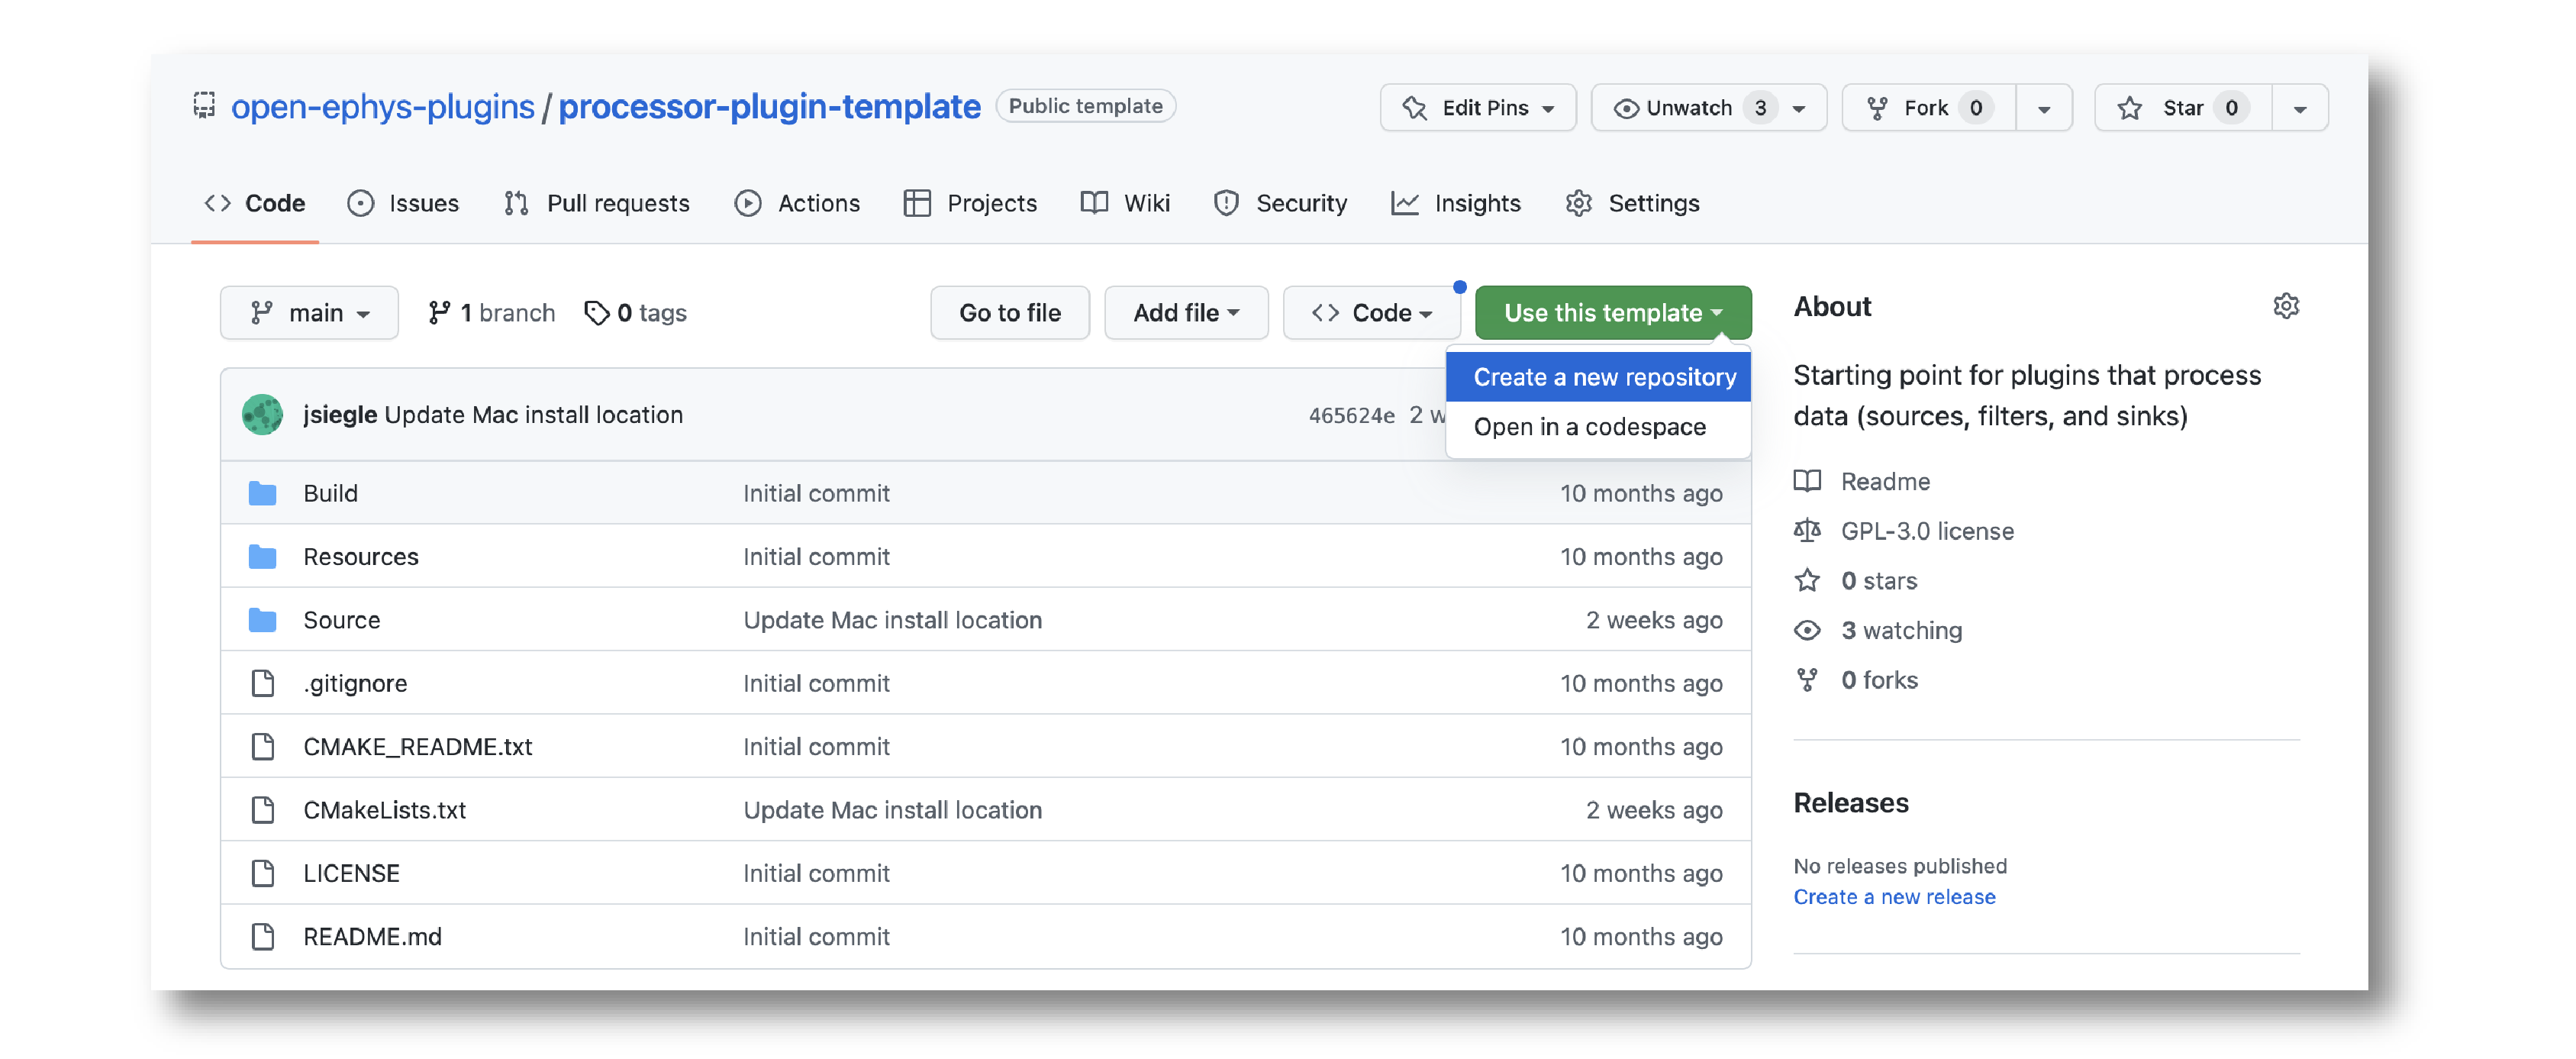
Browse to the Processor Plugin Template repository.
Click the green “Use this template” button and select the “Create a new repository” option.
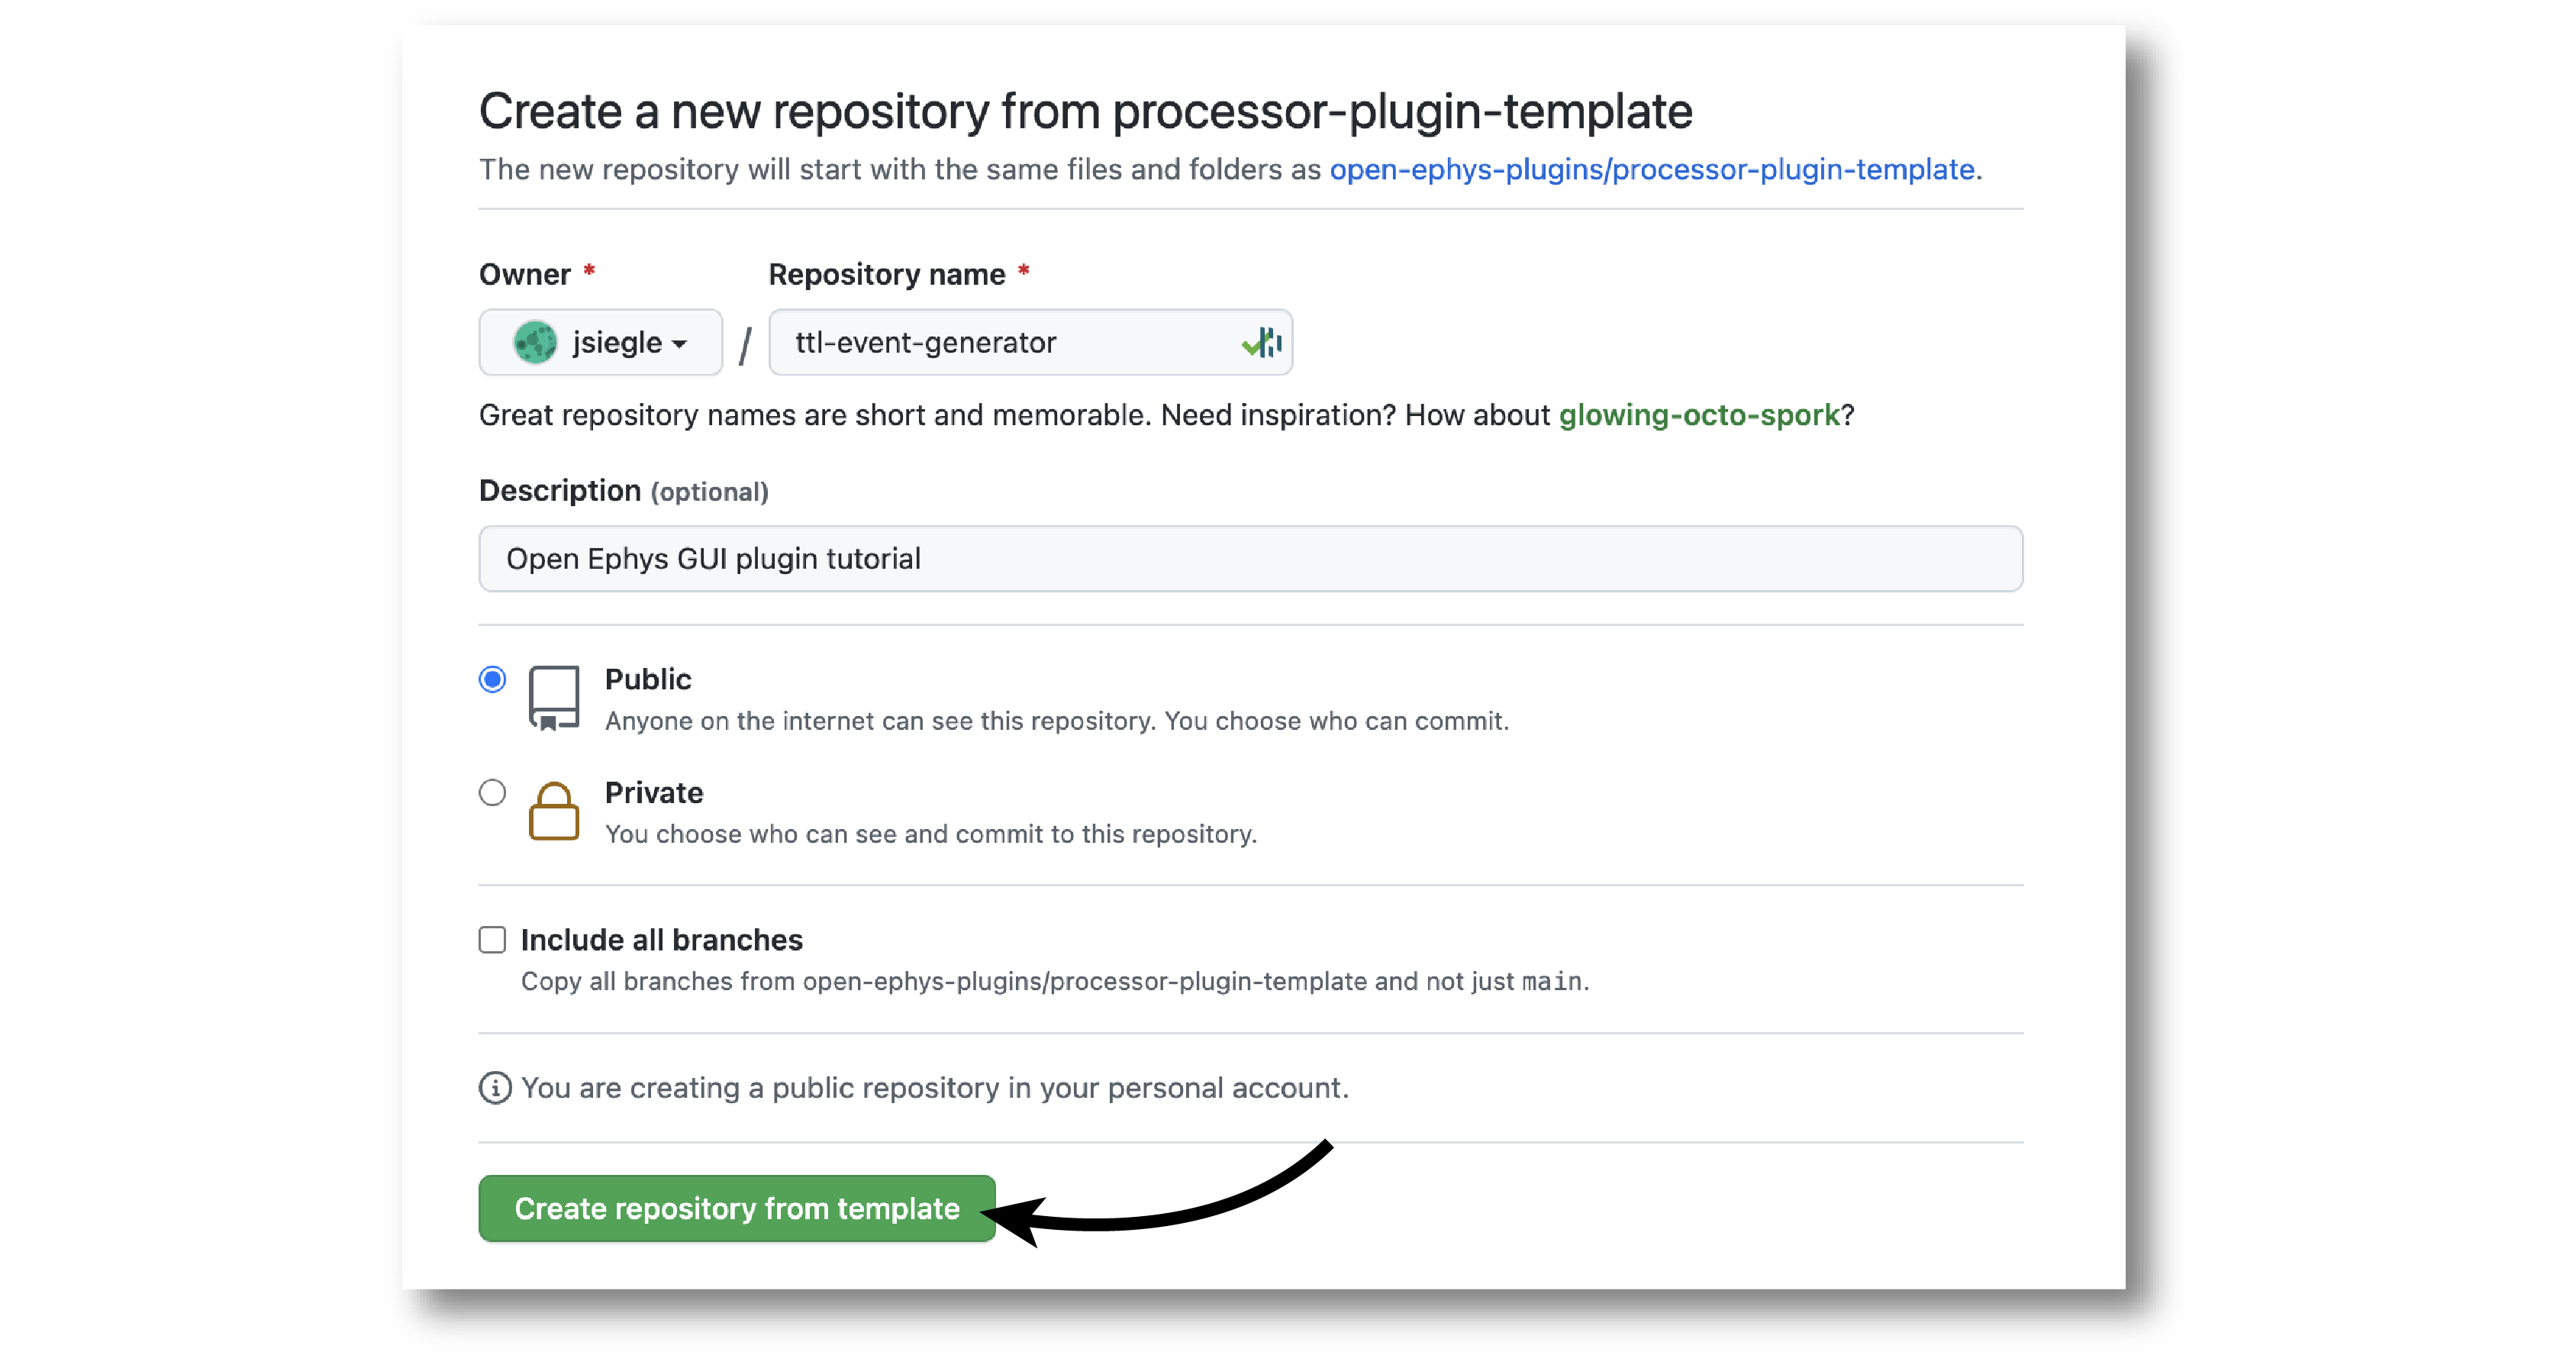
Name the repository “ttl-event-generator”, and optionally add a description. Also be sure to choose which GitHub account will own the repository.
Click the “Create repository” button to initialize a new repository.
On your local machine, create an “OEPlugins” directory within the same directory that contains your plugin-GUI repository. Then, using the git command line interface or the GitHub Desktop app, clone the newly created plugin repository into this directory. Your directory structure should look something like this:
code_directory/
   plugin-GUI/
   OEPlugins/
      ttl-event-generator/
         Build/
         Resources/
         Source/
         .clang-format
         .gitignore
         CMakeLists.txt
         CMAKE_README.txt
         README.md
Editing OpenEphysLib.cpp and other files#
Inside the “Source” directory, you’ll find the OpenEphysLib.cpp file that contains critical information about your plugin. Open it in your preferred text editor and make the following changes:
Change
info->nametoTTL Event GeneratorChange
info->processor.nametoTTL Event GeneratorChange
info->processor.creatorto&(Plugin::createProcessor<TTLEventGenerator>);
When you’re finished, the file should look like this:
extern "C" EXPORT void getLibInfo(Plugin::LibraryInfo* info)
{
   /* API version, defined by the GUI source.
   Should not be changed to ensure it is always equal to the one used in the latest codebase.
   The GUI refuses to load plugins with mismatched API versions */
   info->apiVersion = PLUGIN_API_VER;
   info->name = "TTL Event Generator"; // <---- UPDATE
   info->libVersion = "0.1.0"; // <---- UPDATE
   info->numPlugins = NUM_PLUGINS;
}

extern "C" EXPORT int getPluginInfo(int index, Plugin::PluginInfo* info)
{
   switch (index)
   {
      //one case per plugin. This example is for a processor which connects directly to the signal chain
   case 0:
      //Type of plugin. See "Source/Processors/PluginManager/OpenEphysPlugin.h" for complete info about the different type structures
      info->type = Plugin::Type::PROCESSOR;

      //Processor name
      info->processor.name = "TTL Event Generator"; //Processor name shown in the GUI (UPDATE)

      //Type of processor. Can be FILTER, SOURCE, SINK or UTILITY. Specifies where on the processor list will appear
      info->processor.type = Processor::Type::FILTER;

      //Class factory pointer. Replace "ProcessorPluginSpace::ProcessorPlugin" with the namespace and class name.
      info->processor.creator = &(Plugin::createProcessor<TTLEventGenerator>); // <---- UPDATE
      break;
   default:
      return -1;
      break;
   }
   return 0;
}
Next, rename the source files to match the name of your plugin
ProcessorPlugin.h–>TTLEventGenerator.hProcessorPlugin.cpp–>TTLEventGenerator.cppProcessorPluginEditor.h–>TTLEventGeneratorEditor.hProcessorPluginEditor.cpp–>TTLEventGeneratorEditor.cpp
and update the class names inside each file to match the new names:
ProcessorPlugin–>TTLEventGeneratorProcessorPluginEditor–>TTLEventGeneratorEditor
Finally, update the include inside OpenEphysLib.cpp from #include "ProcessorPlugin.h" to #include "TTLEventGenerator.h".
Compiling your plugin#
At this point, you should be able to compile your plugin and load it into the GUI. We advise you to compile and test the plugin every time you make changes, so that it is easier for you to identify what changes broke the code, in case that happens.
To compile the plugin, please follow the OS-specific instructions described on the compiling plugins page.
Setting up the Processor methods#
Right now, our plugin won’t have any effect on incoming data when it’s placed in the signal chain. Data passed into the process() method will not be altered in any way, nor will any events be added to any of the data stream.
Let’s change that by inserting code to add a TTL ON and OFF events at an interval of 1 second. For now, we will hard-code the relevant parameters. In the subsequent steps, we will make it possible to change these parameters via UI elements in the plugin’s editor.
Before we can add events during acquisition, we need to announce to downstream processors that this plugin is capable of generating its own events. This is done by adding a TTL event channel in the updateSettings() method, which is called whenever the signal chain is modified.
In the plugin’s .h file, add the following lines after loadCustomParametersFromXml:
private:
   EventChannel* ttlChannel; // local pointer to TTL output channel
In the plugin’s .cpp file, add the following lines to updateSettings():
void TTLEventGenerator::updateSettings()
{
   // create and add a TTL channel to the first data stream
   EventChannel::Settings settings{
            EventChannel::Type::TTL,
            "TTL Event Generator Output",
            "Default TTL event channel",
            "ttl.events",
            dataStreams[0]
   };

   ttlChannel = new EventChannel(settings);
   eventChannels.add(ttlChannel); // this pointer is now owned by the eventChannels array
   ttlChannel->addProcessor(this); // make sure the channel knows about this processor
}
Now, if you re-compile the plugin and load it into the signal chain, you should see an extra TTL channel has been added to this plugin and all downstream plugins in the GUI’s Graph Viewer.
Next, we will add some internal variables to track the state of our TTL lines, as well as a method to ensure their state is reset at the start of acquisition.
In TTLEventGenerator.h, add two variables, and also override the startAcquisition() method, which will be used to reset their values:
   bool startAcquisition() override;

private:
   int counter = 0; // counts the total number of incoming samples
   bool state = false; // holds the state of the current TTL line (on or off)
Then, in TTLEventGenerator.cpp, we will make sure the appropriate variables get re-set at the start of acquisition:
bool TTLEventGenerator::startAcquisition()
{
   counter = 0; // reset counter
   state = false; // reset line state

   return true; // indicate that the processor is ready to acquire data
}
Now, we are ready to add events to inside our process() method. First, delete the call to checkForEvents(), because this plugin doesn’t care about incoming events. Then add the following code:
void TTLEventGenerator::process(AudioBuffer<float>& buffer)
{

   // loop through the streams
   for (auto stream : getDataStreams())
   {
      // Only generate on/off event for the first data stream
      if (stream == getDataStreams()[0])
      {
         int totalSamples = getNumSamplesInBlock(stream->getStreamId());
         uint64 startSampleForBlock = getFirstSampleNumberForBlock(stream->getStreamId());

         int eventIntervalInSamples = (int) stream->getSampleRate();

         for (int i = 0; i < totalSamples; i++)
         {
            counter++;

            if (counter == eventIntervalInSamples)
            {

               state = !state;

               int outputLine = 0;

               // add on or off event at the correct offset
               TTLEventPtr eventPtr = TTLEvent::createTTLEvent(ttlChannel,
                startSampleForBlock + i,
                outputLine,
                state);

               addEvent(eventPtr, i);

               // reset counter
               counter = 0;

            }

            // extra check
            if (counter > eventIntervalInSamples)
               counter = 0;
         }
      }
   }
}
After recompiling the plugin, try dropping it into the signal chain after a File Reader. Add an LFP Viewer to the right of the plugin, and start acquisition. You should see the state of TTL event line 1 flipping once per second.
Adding UI components to the editor#
Currently, the TTL line and interval for generating events are hard-coded inside the process() method. In order to make these parameters easy to change at runtime, we need to create a user interface for our plugin. This UI will be defined inside of the TTLEventGeneratorEditor class.
You should have already modified the file and class names for the plugin’s editor; make sure the editor’s .h and .cpp files look like this:
#include <EditorHeaders.h>
#include "TTLEventGenerator.h"

class TTLEventGeneratorEditor : public GenericEditor
{
public:

   /** Constructor */
   TTLEventGeneratorEditor(GenericProcessor* parentNode);

   /** Destructor */
   ~TTLEventGeneratorEditor() { }

private:

   /** Generates an assertion if this class leaks */
   JUCE_DECLARE_NON_COPYABLE_WITH_LEAK_DETECTOR(TTLEventGeneratorEditor);
};
#include "TTLEventGeneratorEditor.h"

TTLEventGeneratorEditor::TTLEventGeneratorEditor(GenericProcessor* parentNode)
   : GenericEditor(parentNode)
{

   desiredWidth = 150;

}
Creating a bounded value parameter editor#
To automatically generate events at certain intervals, let’s add a bounded value parameter editor with a range of event intervals from 0 ms (events disabled) to 5000 ms. We will create the interface inside the TTLEventGeneratorEditor constructor using one of the built-in parameter editors.
First, we need to make sure the parameter is declared by the processor. This is very important! If a parameter editor tries to access a parameter that doesn’t exist, it will lead to a crash. Any creation of parameter objects must be done inside the registerParameters() method.
void TTLEventGenerator::registerParameters()
{
   // Parameter for event frequency (Hz)
   addFloatParameter (Parameter::PROCESSOR_SCOPE, // parameter scope
                     "interval", // parameter name
                     "Interval", // display name
                     "Interval for automated event generation (0 = off)", // parameter description
                     "ms", // unit
                     1000.0f, // default value
                     0.0f, // minimum value
                     5000.0f, // maximum value
                     50.0f); // step size
}
The “processor scope” means this parameter will apply to the entire processor, regardless of which data stream is selected.
Next, we can add the parameter editor to TTLEventGeneratorEditor.cpp:
TTLEventGeneratorEditor::TTLEventGeneratorEditor(GenericProcessor* parentNode)
   : GenericEditor(parentNode)
{

   desiredWidth = 180;

   // event frequency editor
   addBoundedValueParameterEditor (Parameter::PROCESSOR_SCOPE, // parameter scope
                                 "interval", // parameter name
                                 15, // x pos
                                 35); // y pos

}
Note that we also changed the desired width of the plugin to 180, to allow more space for parameter editors.
Now, compile and load the plugin into the GUI to see the newly added parameter editor.

Creating a TTL line parameter editor#
To select which TTL line to send events on, we will use a dedicated TTL line selector. First, initialize the corresponding parameter inside the registerParameters() method:
// Parameter for event TTL line
addTtlLineParameter (Parameter::STREAM_SCOPE, // parameter scope
                     "output_line", // parameter name
                     "Output line", // display name
                     "Output line for generated TTL events"); // parameter description
Next, add the associated editor:
// event output line
addTtlLineParameterEditor (Parameter::STREAM_SCOPE, // parameter scope
                            "output_line", // parameter name
                            15, // x pos
                            65); // y pos
Unlike the FloatParameter, this parameter has “stream scope,” because it’s assumed there will be separate TTL lines for each stream. However, in this case we will only be adding TTL events to the first incoming data stream.
Compile and load the plugin into the GUI to see the newly added TTL line selector.

Clicking on the button will bring up an interface for selecting one of eight TTL lines to use.
Creating a custom parameter editor (optional)#
To make it possible for the user to trigger TTL events manually, we will add a button to the editor that the user can click on to generate an event. Since there is no built-in parameter editor for this, we need to create a custom one. To do this, add a ManualTriggerButton class above the main editor class in the TTLEventGeneratorEditor.h file:
class ManualTriggerButton : public ParameterEditor,
   public Button::Listener
{
public:

   /** Constructor */
   ManualTriggerButton(Parameter* param);

   /** Destructor*/
   virtual ~ManualTriggerButton() { }

   /** Respond to trigger button clicks*/
   void buttonClicked(Button* label) override;

   /** Update view of the parameter editor component*/
   void updateView() {};

   /** Sets component layout*/
   void resized() override;

private:
   std::unique_ptr<UtilityButton> triggerButton;
};
Then, in the custom parameter editor’s constructor, we’ll initialize the button, add a button listener, set the bounds, and make it visible in the editor by adding the following lines of code:
ManualTriggerButton::ManualTriggerButton(Parameter* param)
     : ParameterEditor(param)
{
   triggerButton = std::make_unique<UtilityButton>("Trigger", Font("Fira Code", "Regular", 12.0f)); // button text, font to use
   triggerButton->addListener(this); // add listener to the button
   addAndMakeVisible(triggerButton.get());  // add the button to the editor and make it visible

   setBounds(0, 0, 90, 25); // set the bounds of custom parameter editor
}
To handle button clicks, implement the buttonClicked method as indicated below. Inside this method, we need to call setNextValue() on the parameter as that will notify the processor about parameter value change. We also need to set the bounds of the button in the resized() method as follows:
void ManualTriggerButton::buttonClicked(Button* b)
{
   param->setNextValue(triggerButton->getLabel());
}

void ManualTriggerButton::resized()
{
   triggerButton->setBounds(0, 0, 90, 25);
}
Now, we need to initialize the custom parameter editor inside the TTLEventGeneratorEditor constructor by getting the pointer to the parameter that we will create inside the TTLEventGenerator processor constructor, like this:
#include "TTLEventGenerator.h"
// custom button parameter editor
Parameter* manualTrigger = getProcessor()->getParameter("manual_trigger");
addCustomParameterEditor(new ManualTriggerButton(manualTrigger), 50, 95);
// Parameter for manually generating events
 addNotificationParameter (Parameter::PROCESSOR_SCOPE, // parameter scope
                           "manual_trigger", // parameter name
                           "Trigger", // display name
                           "Triggers a TTL event", // description
                           false); // deactivate during acquisition
Note
Since the custom button parameter editor is only used to tell the processor to trigger an event, we are creating a “Notification” parameter to handle button click callbacks only.
Compile and load the plugin into the GUI to see the newly added button:

Responding to parameter value changes#
Now, let’s allow our UI elements to change the state of the plugin. To do this, we need to create variables inside the TTLEventGenerator class that can be updated by our bounded value, TTL line, and button parameter editors. The values of these variables must be updated through a special method, called parameterValueChanged(), which responds to any parameter editor value changes. This is because the process() method is called by a separate thread from the user interface, and the variables it needs to access can only be updated at specific times. Modifying variables via parameterValueChanged() ensures that they are handled properly, and prevents unexpected behavior or segmentation faults.
First, let’s update the TTLEventGenerator header file as follows:
   /** Called whenever a parameter's value is changed */
   void parameterValueChanged(Parameter* param) override;

private:

     int counter = 0; // counts the total number of incoming samples
     bool state = false; // holds the state of the current TTL line (on or off)

   bool shouldTriggerEvent = false; // true if an event should be manually triggered
   bool eventWasTriggered = false; // true if an event was manually triggered
   int triggeredEventCounter = 0; // counter for manually triggered events

   float eventIntervalMs = 1000.0f; // time between events
   int outputLine = 0; // TTL output line
Important
Always be sure to provide values for all member variables in the header file or class constructor in order to avoid unexpected behavior.
Now, we can define how these variables are updated inside the parameterValueChanged() method:
void TTLEventGenerator::parameterValueChanged(Parameter* param)
{
   if (param->getName().equalsIgnoreCase ("manual_trigger"))
   {
      shouldTriggerEvent = true;
      LOGD ("Event was manually triggered"); // log message
   }
   else if (param->getName().equalsIgnoreCase ("interval"))
   {
      eventIntervalMs = (float) param->getValue();
   }
   else if (param->getName().equalsIgnoreCase ("output_line"))
   {
      outputLine = (int) param->getValue();
   }
}
Note
We’ve added a logging output to demonstrate the recommended way to log information used for development/debugging. Calls to LOGD will be printed to the console in debug mode, and written to the log file in debug and release mode. Calls to LOGC will always be printed to the console and written to the log file. See the Open Ephys Plugin API documentation for more info on logging.
Finally, we need to update our process method to make use of these parameters:
void TTLEventGenerator::process(AudioBuffer<float>& buffer)
{
   // loop through the streams
   for (auto stream : getDataStreams())
   {
      // Only generate on/off event for the first data stream
      if(stream == getDataStreams()[0])
      {

         int totalSamples = getNumSamplesInBlock(stream->getStreamId());
         uint64 startSampleForBlock = getFirstSampleNumberForBlock(stream->getStreamId());

         int eventIntervalInSamples;

         if (eventIntervalMs > 0)
         eventIntervalInSamples = (int) stream->getSampleRate() * eventIntervalMs / 2 / 1000;
         else
            eventIntervalInSamples = (int)stream->getSampleRate() * 100 / 2 / 1000;

         if (shouldTriggerEvent)
         {

            // add an ON event at the first sample.
            TTLEventPtr eventPtr = TTLEvent::createTTLEvent(ttlChannel,
               startSampleForBlock,
               outputLine, true);

            addEvent(eventPtr, 0);

            shouldTriggerEvent = false;
            eventWasTriggered = true;
            triggeredEventCounter = 0;
         }

         for (int i = 0; i < totalSamples; i++)
         {
            counter++;

            if (eventWasTriggered)
               triggeredEventCounter++;

            if (triggeredEventCounter == eventIntervalInSamples)
            {
               // add off event at the correct offset
               TTLEventPtr eventPtr = TTLEvent::createTTLEvent(ttlChannel,
                  startSampleForBlock + i,
                  outputLine, false);

               addEvent(eventPtr, i);

               eventWasTriggered = false;
               triggeredEventCounter = 0;
            }

            if (counter == eventIntervalInSamples && eventIntervalMs > 0)
            {

               state = !state;

               // add on or off event at the correct offset
               TTLEventPtr eventPtr = TTLEvent::createTTLEvent(ttlChannel,
                  startSampleForBlock + i,
                  outputLine, state);

               addEvent(eventPtr, i);

               counter = 0;

            }

            if (counter > eventIntervalInSamples)
               counter = 0;
         }
      }
   }

}
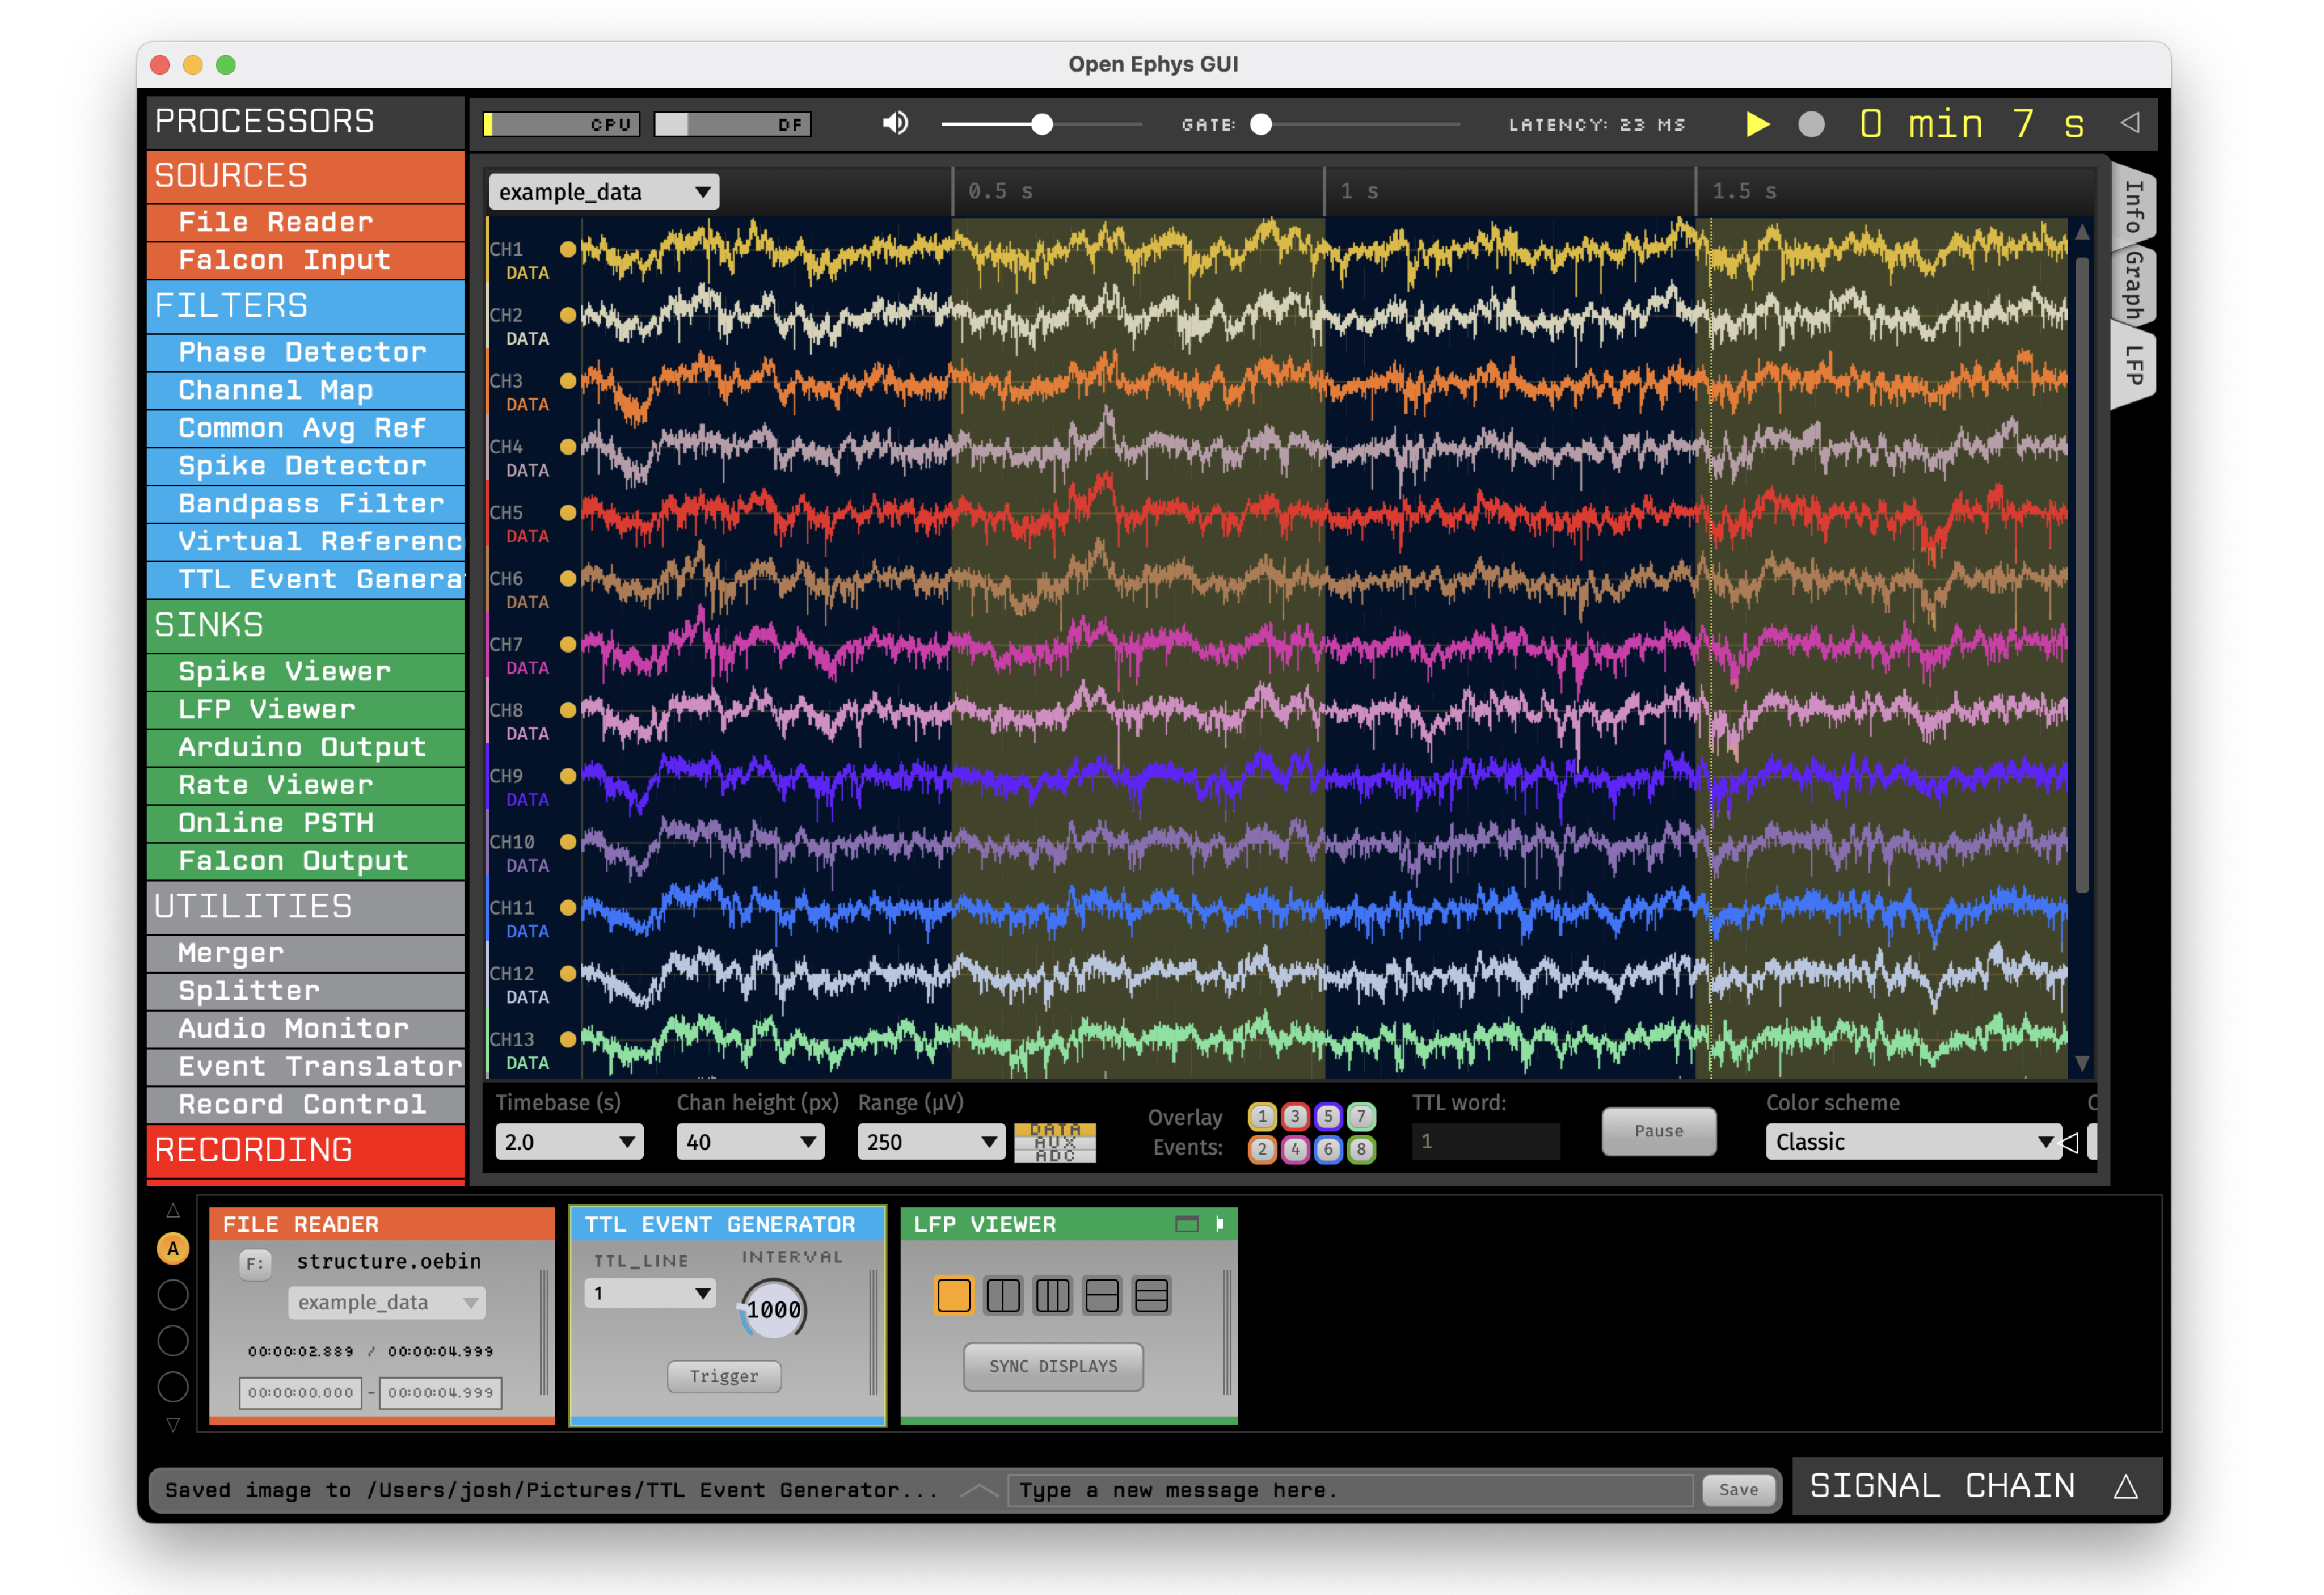
And that’s it! If you compile and test your plugin, the UI elements in the editor should now change the events that appear in the LFP Viewer:
Next steps#
There are a number of ways this plugin could be enhanced. To practice creating different kinds of UI elements, you could try implementing some of the features below, or come up with your own!
Ensure an “OFF” event is sent when the output bit is changed.
Add a button that toggles the plugin’s output on and off.
Add another bounded value parameter that can be used to define the duration of each event (currently the output bit flips at a 50% duty cycle).
Make all the parameters stream-specific and generate TTL events for each input stream.