Record image and orientation data to file#
Note
This tutorial builds on the Quick Start Guide and previous tutorials.
After following this tutorial, the user will be able to save image data and timestamped orientation data from the UCLA Miniscope v4.


Workflow Description#
Save Image Data

The
Imagenode connects to aVideoWriternode. TheVideoWriteroperator writes data to a video file according to settings in the Properties pane that appears after left-clicking theVideoWriternode.There are two
VideoWriteroperators. The first one is from theBonsai.Visionpackage, and the second one is from theBonsai.FFmpegpackage. They are both sink operators as indicated by the nodes’ purple color and the orientation of their grey arcs. A sink operator saves data or triggers external events.The first
VideoWriteroperator is enabled. It can be disabled by clicking it and pressing Ctrl+D. It is configured to save video using a Y800 (no compression) codec.The second
VideoWriteroperator is disabled. It can be enabled by clicking it and pressing Ctrl+Shift+D. It is configured to save video using an 8-bit FFV1 (lossless compression) codec.The
Annotationnodes (which contain a “#” symbol) are simply there to indicate the difference between theBonsai.Vision.VideoWriteroperator and theBonsai.FFmpeg.VideoWriteroperator. They don’t provide any functional difference in the workflow. You can think of them like comments in code.
Save Timestamped Orientation (Quaternion) Data

The
FrameNumber, Quaternionnode connects to theTimestampnode. TheTimestampoperator appends timestamps to items that are emitted by the upstream operator.The
Timestampnode connects to theCsvWriternode. TheCsvWriteroperator writes data to a csv file according to settings in the Properties pane that appears after left-clicking theCsvWriternode.
Configure the Hardware#
Configure the hardware as in the Quick Start Guide or as in the Automate tether commutation using 3D orientation data tutorial if you are using an Open Ephys Commutator.
Get Started in Bonsai#
In addition to the setup steps outlined in previous tutorials, install the following package:
Bonsai.FFmpeg: controls video output encoding.
This package requires installing FFmpeg separately in order to work. Follow the FFmpeg installation guide available in documentation for the Bonsai.FFmpeg package .
Operate the Workflow#
Set the
UCLAMiniscopeV4operator’sIndexproperty to the value that corresponds to the index of your miniscope.If using a commutator, set the COM port associated with your commutator in the workflow. If not using a commutator, delete the nodes corresponding to the commutation.
Save data according to your specifications:
Image video data:
Left-click the enabled
VideoWriternode and edit fields under the properties pane. Confirm the frame rate matches that of theUCLAMiniscopeV4operator. Make sure the file name has a valid extension (“.avi”). “Y800”, an uncompressed greyscale codec, is specified as theFourCC.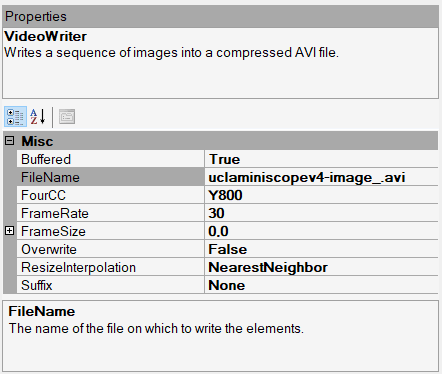
Alternatively, you can also use
VideoWriterfrom the Bonsai.FFmpeg library to save video. This provides more flexibility to save video files using FFMpeg as the backend.Disable the first
VideoWriternode and enable the second one. The description of the node in the properties pane can help you distinguish between them. Left-click the enabledVideoWriternode and edit fields under the properties pane. Confirm frame rate matches that of the UCLA Miniscope v4. Make sure the file name has a valid extension (“.avi”). The parameters inOutputArgumentsspecify an 8-bit video with “FFV1”, a lossless compression codec, as the FourCC. Here are FFmpeg settings that output a compressed grayscale 8-bit video: “-c: ffv1 -pix_fmt gray -bits_per_raw_sample 8”.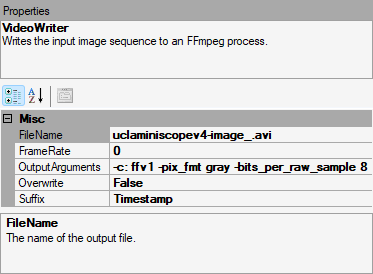
Tip
The FFV1 codec produces smaller files (~30% reduction can be expected), but it requires software that supports loading/playing back this kind of video.
Orientation quaternion data:
Left-click the
CsvWriternode and edit fields under the properties pane. Make sure the file name has a valid extension (“.csv”).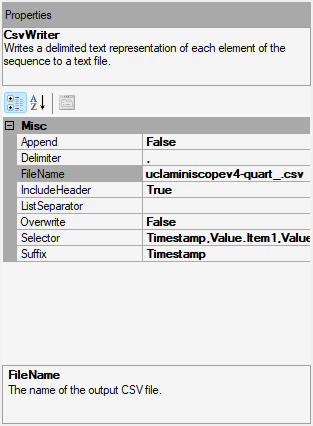
Note
It is best practice to set the
Suffixproperty to Timestamp or FileCount or set the Overwrite property to False to avoid accidentally overwriting important data.Left-click a property field’s corresponding label to display the property’s detail at the bottom of the properties pane (e.g. how it is for the
FileNameproperty in the two above screenshots)To temporarily disable saving image or orientation data, disable the respective Writer operator left-clicking the Disable option in the menu that appears after right-clicking an enabled node (or left-clicking the node and using the
Ctrl+Dhotkey). Re-enable the Writer node by left-clicking the Enable option in the menu that appears after right-clicking a disabled node (or left-clicking the node and using theCtrl+Shift+Dhotkey).
Run the workflow for some time to collect data.
Navigate to the directory where data was saved which was specified in step 3. Confirm the data exists and comports with expectations. The image can be easily viewed in any media playback software that supports the
FourCCvalue specified in step 3. The orientation data can be easily viewed in any spreadsheet software that supports .csv files.