Deprecated since version 1.2.13: Bonsai.ONIX is deprecated.
To use ONIX with Bonsai, refer to the documentation for OpenEphys.Onix1.
NeuropixelsV1eDevice#
Important
To use this device with ONIX hardware, you must first use the ONIContext configuration GUI to set the headstage port to “Passthrough Mode”
Important
Bonsai workflows that contain this node will not open/load unless the headstage is on - Error message: There was an error opening the workflow. Make sure to configure the headstage port voltage and mode correctly using the ONIContext node with the parameters for the Neuropixels-1.0e Headstage before connecting the headstage.
A Bonsai source that wraps a Neuropixels 1.0e device.
- Inputs:
None
- Outputs:
A single
NeuropixelsV1eDataFramethat contains one or more Neuropixels 1.0e “Ultraframes”. One Ultraframe contains the following elements:A single LFP-band sample from all 384 electrodes
12 spike-band samples from all 384 electrodes
A 20-bit counter that increments for each “Frame” transmitted by the probe. 156 frames are required to make a single Ultraframe. This counter can be checked to ensure no data is dropped.
The number of Ultraframes in each output is determined by the
BlockSizeparameter

Configuration#
Configuration is performed using a combination of the property pane and a dedicated configuration GUI.
Property Pane#
Parameters available through the property pane are as follows:
Name |
Type |
Description |
|---|---|---|
EnableStream |
boolean |
Enable the device data stream |
BlockSize |
integer |
The number of Ultraframes that are included in each NeuropixelsV1eDataFrame. Larger numbers result in less overhead at the cost of larger buffering latencies. |
RequireSNMatch |
boolean |
If True, the configuration and probe serial numbers must match to start acquisition. Keeping this parameter set to True is good practice because the correct calibration files must be loaded in order for the probe to function properly. Error message if set to True and not properly configured: Probe and configuration serial numbers do not match. |
NeuropixelsV1Configuration |
N/A |
Editing this parameter will open the Configuration GUI, just like double clicking on the node. |
Configuration GUI#
The Neuropixels 1.0e Configuration GUI, which is a part of the
Bonsai.ONIX.Design package, is opened by double clicking on the
NeuropixelsV1eDevice node when editing the workflow or clicking the ellipsis
next to the NeuropixelsV1Configuration parameter option in the property
pane.
The Neuropixels 1.0e configuration GUI.#
Importing IMEC Calibration Data#
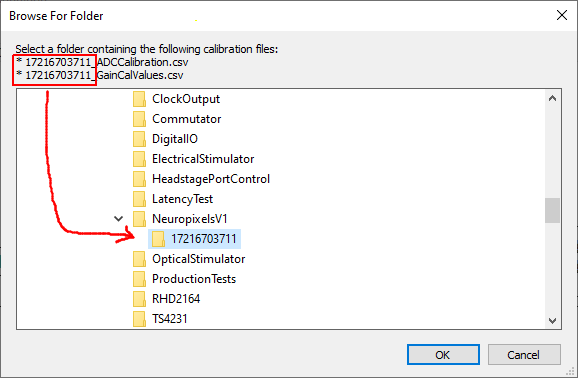
Neuropixels 1.0 probes are shipped with two calibration files that must be uploaded to the probe for proper operation. For example, the calibration files for probe 19051023592 are:
The calibration files for your probe will have “19051023592” replaced with your probe’s serial number. These files contain parameters that are used to correct probe-specific ADC zero-crossing nonlinearities, set on-chip biases, and linearize individual electrode responses. For a complete explanation of the content of these files, please consult the Neuropixels documentation site.
Warning
Failure to upload IMEC-provided calibration and gain correction files will result in data that is not standardized and therefore not comparable with other Neuropixels 1.0e recordings.
To load the IMEC calibration files for your probe, follow these steps:
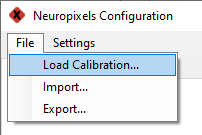
Select Load Calibration from the File menu.
On the file selection dialog, navigate to the folder containing the calibration files with serial numbers matching the currently attached probe.
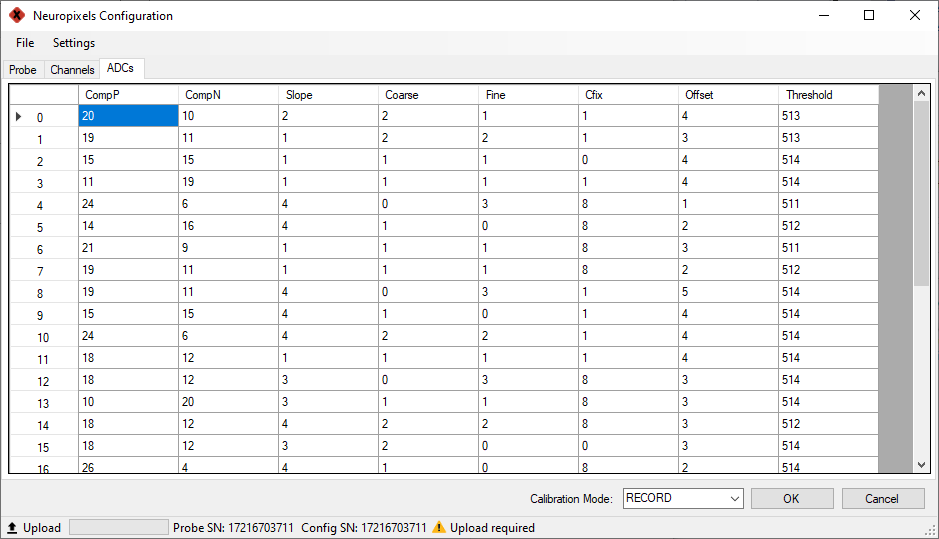
The Channels and ADCs tabs will now show proper calibration parameters.
Configuring the Probe#
The easiest way to select active electrodes is by using the GUI on the Probe tab. This simple user interface lets you pan around the probe, zoom in and out, and set the properties of individual electrodes or groups of them.
Mouse action |
Function |
|---|---|
Left click + drag |
Block select |
Middle click + drag |
Pan |
Right click |
Open electrode configuration context menu |
Scroll forward |
Zoom in |
Scroll backward |
Zoom out |
Active electrodes are colored blue, inactive are white, and selected electrodes are orange. Groups of electrodes can be selected by left clicking and dragging. Once highlighted, their properties can be changed using right click to open the configuration context menu.
Aside form the Probe tab, the Channels tab can be used to examine and tune the probe parameters. If you want to apply a from one electrode to the entire probe, right-click it and select Apply to column.
Todo
Image of apply all dialog
Uploading to the Probe#
To upload your configuration to the probe, click the Upload button in the bottom left of the GUI. A progress bar will indicate the upload progress.
Note
To ensure that this process has occurred correctly, the Perform Read Check option can be selected from the Settings menu:
If this option is checked, then the upload will occur two times. The first will load the configuration and the second will do a comparison of the values stored on the probe to the redundant upload and report an error if there is a mismatch. This option is active by default.
Saving Configurations#
Complete probe configurations can be saved in easy to parse JSON or XML formats. These files contain complete information about the state of a given probe. This includes all calibration file information, active electrodes, gains etc, and therefore can be useful metadata during analysis.
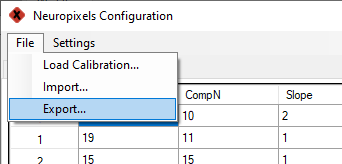
Select Export… from the File menu;
Choose if JSON or XML should be used in the file selection dialog and save:

Loading Configurations#
Configuration files can be imported to, for instance, recall a pattern of active electrodes.
Warning
You can import the configuration data from a previous probe, for instance to re-create a custom electrode layout. However, you will need to replace the calibration parameters from the previous probe with the current one before using it.
Select Import from the File menu:

Select a previously exported configuration file:
