
Acquisition Within Bonsai#
Installation#
Everything on this page needs Bonsai and the OpenEphys.Miniscope packages installed. This
is the same setup described in the Quick Start Guide.
Note
Bonsai and the OpenEphys.Miniscope packages all run on 64-bit Windows
only.
The Miniscope DAQ works over USB, so configure the operating system’s USB settings to avoid suspending the device due to power management.
Download and install Bonsai , either as a portable environment or as a system-wide application.
Install the following packages from the Bonsai Package Manager , making sure the Package source set to “All”:
Bonsai.StarterPack: the “standard library” for Bonsai, containing tools used in almost every workflow.OpenEphys.Miniscope.Design: an extension of theOpenEphys.Miniscopelibrary that includes graphical elements. InstallingOpenEphys.Miniscope.Designautomatically installsOpenEphys.Miniscopeas a dependency.OpenEphys.Miniscope.Gui(Optional): The MiniscopeV4 GUI can be used as Bonsai operator and launched from a Bonsai workflow.Note
The MiniscopeV4 GUI is currently in alpha. During this time the package is not published to NuGet, so it does not appear in the Bonsai package manager and has to be installed from a local file instead. Click here to download the package and follow the Installing a Local NuGet Package in Bonsai article in the Open Ephys Wiki to see how to install the package you just downloaded in Bonsai.
If you only want to run the GUI as a standalone application, you can install the standalone installer. See Open Ephys Miniscope V4 GUI.
Basic Miniscope Control and Acquisition#
Copy or download the following workflow using the corresponding icons and paste the contents or open the .bonsai file in Bonsai:

 uclaminiscopev4-miniscopedaq-quick.bonsai
The
UclaMiniscopeV4node represents aUclaMiniscopeV4source operator as indicated by its green color and the orientation of its gray arc. Source operators produce data.The
UclaMiniscopeV4operator’s output (Bonsai.Miniscope.V4Frame) has four members. They can be accessed by right-clicking theUclaMiniscopeV4node and hovering the cursor over the Output option in the pop-up menu. Left-clicking on one of these members automatically places a newMemberSelectornode. These nodes can also be placed by searching modules in the search bar in the Toolbox pane or by using theCtrl+Ehotkey.The
MemberSelectoroperators are transform operators as indicated by the nodes’ blue color and lack of gray bar. Transform operators transform data. TheMemberSelectoroperator transforms data by selecting one or multiple members of its input to output.In this workflow, the
ImageandQuaternionmembers are selected fromBonsai.Miniscope.V4Frameto be visualized.
Using the drop-down list, set the
UclaMiniscopeV4operator’sIndexproperty to the value that corresponds to the index of your miniscope.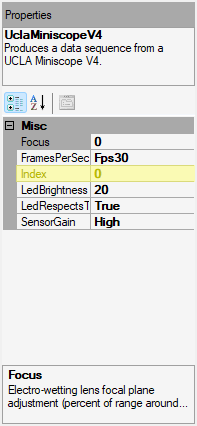
Note
If there is no value populated in the drop-down, check the hardware connections. If there are multiple Miniscope DAQs connected to your PC, iterate through the index values while testing the node’s functionality to verify what index corresponds to each miniscope.
Start the Bonsai workflow by left-clicking the green Start button at the top of the Bonsai workflow editor or by pressing
F5. Once the workflow is running, you can test various features:Real-time Data Visualization
- Image Data:
Double left-click the
Imagenode. This displays a real-time visualization of image data from the sensor. Try imaging a sample such as a tissue paper. Confirm that the magnified image of the sample appears in theImagenode visualizer.
- Orientation Data:
Double left-click the
Quaternionnode. This displays a real-time visualization of quaternion data which represents the miniscope’s orientation. Right-click the visualization, and left-click the drop-down menu. Set the value in theHistory Lengthfield to 100. Reorient the UCLA Miniscope v4. Confirm the quaternion visualization responds accordingly. To learn more about how to interpret quaternion data, visit the IMU Data article in the Open Ephys Wiki.
Miniscope Settings Configuration
Left-click the
UclaMiniscopeV4node to access the Properties pane on the right.- Frame Rate:
Change the
FramesPerSecondvalue by left-clicking the corresponding field’s drop-down menu located in the Properties pane and selecting a different option. Frame rate and exposure-duration-per-frame are inversely related, so higher frame rates produce darker images. Use this information and look at theImagenode visualizer to confirm that the frame rate adjusts according to theFramesPerSecondvalue. A discerning eye can also notice changes in frame rate, but that requires a moving image.
- Sensor Gain:
Change the
SensorGainvalue by left-clicking the corresponding field’s drop-down menu located in the Properties pane and selecting a different option. Look at theImagenode visualizer to confirm that the sensor’s gain is adjusted according to the value ofSensorGainvalue.
- Excitation Light Intensity:
Change the
LEDBrightnessvalue by left-clicking the corresponding field’s drop-down menu located in the Properties pane and sliding the scrollbar. Confirm that the intensity of the excitation light adjusts according to theLEDBrightnessvalue.
- Dynamic Focusing:
Place the miniscope approximately its working distance away from the sample. Change the
EWLvalue by left-clicking the corresponding field’s drop-down menu located in the Properties pane and selecting a different option. Look at theImagenode visualizer shifting in and out of focus according to theEWLvalue.
Find out how to record image and orientation data, how to perform automatic commutation to prevent the tether from twisting, how to gate data acquisition with a hardware trigger, and more in the Open Ephys Miniscope V4 GUI.
Tutorials#
To understand how the UclaMiniscopeV4 can be used directly, check out the following tutorials.
Remember that everywhere the UclaMiniscopeV4 node is placed, the MiniscopeV4Gui.bonsai
included workflow can be swapped in without changing the downstream logic while allowing for full
visualization with the GUI.
Rotate the coaxial tether automatically from the Miniscope’s orientation data, and control the commutator manually with keypresses.
Write image data and timestamped orientation data to disk, with a choice of video codecs.
Gate recording with a hardware digital signal, producing one file set per trigger pulse.
Use the complete Miniscope V4 GUI as a Bonsai Operator that can be combined with custom workflows.