
Installing and Using the GUI#
Installation#
Requirements: 64-bit Windows 10 or 11, and an internet connection during installation.
Download the GUI here and extract the
MiniscopeV4Gui-Setup-<version>.exeinstaller.Run the installer. It installs per-user into
%LOCALAPPDATA%\MiniscopeV4Gui, so no administrator rights are required. The GUI is only installed to this folder, and will not affect files or programs stored anywhere else on the computer.When installing, Windows may display a “Windows protected your PC” or “Unknown publisher” warning. This is expected. To continue, click More info, verify that the correct program is trying to run, and click Run anyway.
At the end of installation, the setup downloads all necessary dependencies. This step needs an internet connection and can take a few minutes.
The installer creates an Open Ephys Miniscope V4 GUI shortcut on your Desktop and in the Start Menu.
Tip
To uninstall, use Add or remove programs and uninstall Open Ephys Miniscope V4 GUI. Or,
delete the %LOCALAPPDATA%\MiniscopeV4Gui folder, which would fully remove the GUI from the
computer as well.
Launching the GUI#
Launch the GUI from the Desktop or Start Menu shortcut.
On startup the GUI restores the settings from the last session, which are kept in
default_miniscopev4_config.yml in the install folder. Closing the GUI window stops
acquisition and saves the current configuration to the same configuration file.
Starting Acquisition#
Choose the Miniscope. Set
Indexin the status bar to the index of your Miniscope, in the order the Miniscopes are detected by the computer.0is the first Miniscope; if you only have one Miniscope connected,0will be correct.
Note
There is no way to tell which index corresponds to which physical Miniscope ahead of time; the GUI does not show a serial number or name for each one. If you have more than one connected, try each index in turn and check the incoming data once acquisition starts to see which Miniscope you’ve selected.
Start acquiring. Click Start Acquisition. The Image tab begins showing live frames, and the acquisition timer in the status bar starts counting.

Tip
If you are using a commutator, check Auto Connect in the Commutator section before starting to ensure the commutator is connected when acquisition starts. When Auto Connect is enabled, acquisition cannot start until a commutator is found.
Set up the optics. In the Control Panel on the left, open the Miniscope section and adjust:
- LED Brightness:
The excitation LED level, as a percentage of maximum current. Start low and increase until the sample is visible; the relationship between this value and radiance is non-linear.
- Focus:
The electrowetting lens (EWL) adjustment around its nominal focal plane, from -100% to 100%. Place the Miniscope roughly its working distance from the sample first, then adjust.
- Frame Rate:
Frames acquired per second.
- Sensor Gain:
The image sensor’s analog gain.
- LED Trigger:
Turn on the LED when the selected DigitalIn pin is high. To keep the LED on continuously, choose
None.
Check for saturation. Switch to the Saturation tab to see which pixels exceed the intensity threshold, and to the Histogram signal tab to see the overall distribution of pixel intensities. Lower the LED brightness or the sensor gain if a large fraction of the image is saturated.
Check the orientation data. Check the Euler Angles signal tab and rotate the Miniscope. The traces should respond immediately. This confirms the on-board IMU is streaming data, which is also what drives automatic commutation.
Record. In the Recording section at the bottom of the Control Panel, (1) click
...to choose a folder and base file name, then (2) click Record (or press Ctrl+R). See Recording Data with the Miniscope GUI for the recording modes and the files produced.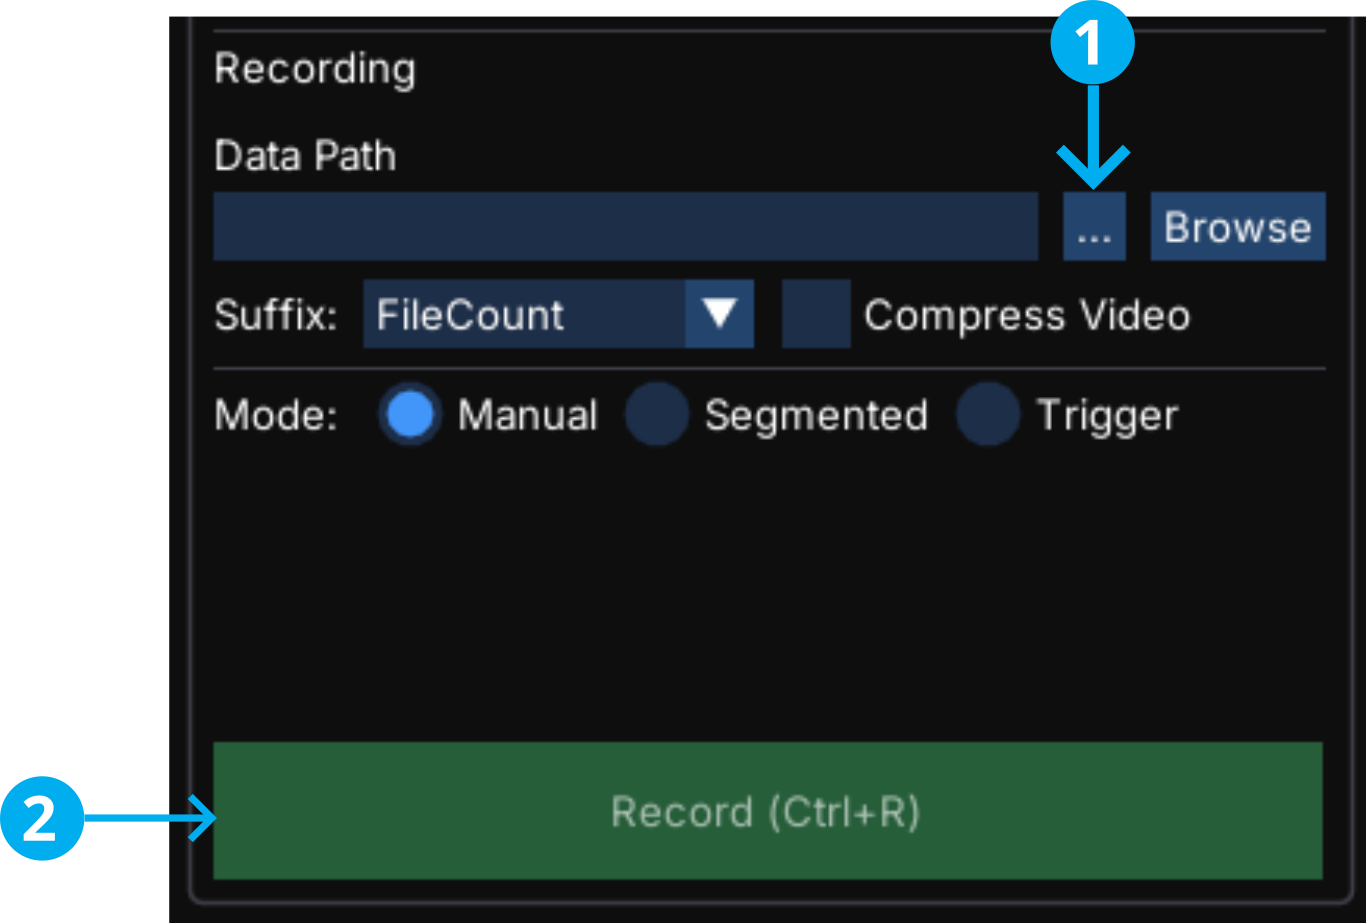
Stop. Click Stop Recording, then Stop Acquisition.