Workflow Tutorial#
Download the following workflow (.bonsai file) and open it with Bonsai:

 uclaminiscopev4-miniscopedaq-savedata.bonsai
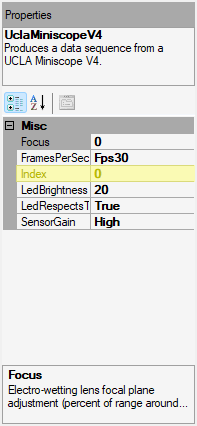
Set the
UCLAMiniscopeV4operator’sIndexproperty to the value that corresponds to the index of your miniscope.Set the
Indexvalue by clicking on the ... dropdown available at theIndexfield that appears in the Properties pane after left-clicking theUCLAMiniscopeV4node.Click Scan and choose from one of the indices that appear. This might take time if many physical or virtual camera devices are connected to your computer.
Click Ok.
Note
If there are multiple miniscopes connected to your PC (including laptop webcams), finding the correct index value might involve an iterative trial-and-error process.
Save data according to your specifications:
Image video data:
Left-click the enabled
VideoWriternode and edit fields under the properties pane. Confirm the frame rate matches that of theUCLAMiniscopeV4operator. Make sure the file name has a valid extension (“.avi”). “Y800”, an uncompressed greyscale codec, is specified as theFourCC.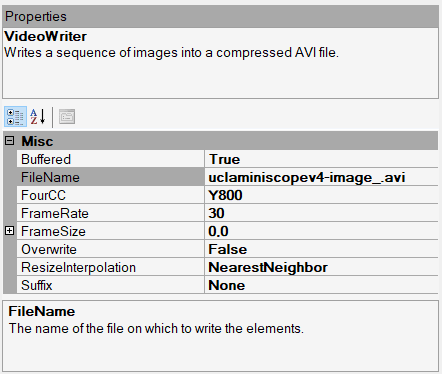
Alternatively, you can also use
VideoWriterfrom the Bonsai.FFmpeg library to save video. This provides more flexibility to save video files using FFmpeg as the backend.Disable the first
VideoWriternode and enable the second one. The description of the node in the properties pane can help you distinguish between them. Left-click the enabledVideoWriternode and edit fields under the properties pane. Confirm frame rate matches that of the UCLA Miniscope v4. Make sure the file name has a valid extension (“.avi”). The parameters inOutputArgumentsspecify an 8-bit video with “FFV1”, a lossless compression codec, as the FourCC. Here are FFmpeg settings that output a compressed grayscale 8-bit video: “-c: ffv1 -pix_fmt gray -bits_per_raw_sample 8”.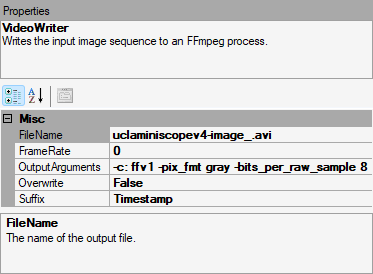
Tip
The FFV1 codec produces smaller files (~30% reduction can be expected), but it requires software that supports loading/playing back this kind of video.
Orientation quaternion data:
Left-click the
CsvWriternode and edit fields under the properties pane. Make sure the file name has a valid extension (“.csv”).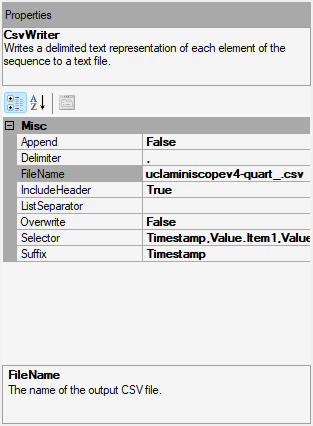
Note
It is best practice to set the
Suffixproperty to Timestamp or FileCount or set the Overwrite property to False to avoid accidentally overwriting important data.Left-click a property field’s corresponding label to display the property’s detail at the bottom of the properties pane (e.g. how it is for the
FileNameproperty in the two above screenshots)To temporarily disable saving image or orientation data, disable the respective Writer operator left-clicking the Disable option in the menu that appears after right-clicking an enabled node (or left-clicking the node and using the
Ctrl+Dhotkey). Re-enable the Writer node by left-clicking the Enable option in the menu that appears after right-clicking a disabled node (or left-clicking the node and using theCtrl+Shift+Dhotkey).
Start the workflow by left-clicking the Start button (indicated by green triangle) at the top of the Bonsai workflow editor or pressing
F5while the Bonsai workflow editor is the active window.Stop the workflow by left-clicking the Stop button (indicated by dark red square) at the top of the Bonsai workflow editor or pressing
Shift+F5while the Bonsai workflow editor is the active window.Navigate to the directory where data was saved which was specified in step 3. Confirm the data exists and comports with expectations. The image can be easily viewed in any media playback software that supports the
FourCCvalue specified in step 3. The orientation data can be easily viewed in any spreadsheet software that can supports .csv files.