NI-DAQmx#
Plugin Type |
Source |
Platforms |
Windows only |
Built in? |
No |
Key Developers |
Pavel Kulik |
Source Code |
Requirements#
One National Instruments data acquisition (DAQ) device (PXI, PCI, or USB); see below for a list of devices we’ve tested.
(optional) An NI terminal block (e.g. BNC-2090A or BNC-2110) and compatible cables
Installed NI-DAQmx drivers (available for download here; version 19.0+ recommended).
For synchronization: One digital input line shared between all data sources streaming data to the GUI (e.g., Open Ephys acquisition board, Neuropixels PXI basestation, other NI devices).
Installing and upgrading#
The NI-DAQmx plugin is not included by default in the Open Ephys GUI. To install, use ctrl-P or ⌘P to open the Plugin Installer, browse to the “NI-DAQmx” plugin, and click the “Install” button.
The Plugin Installer also allows you to upgrade to the latest version of this plugin, if it’s already installed.
Compatible hardware#
So far, we’ve tested the following devices with this plugin:
Device |
Inputs |
Price |
PXI-6133 |
8 analog, 8 digital |
$3643 |
PXIe-6341 |
16 analog, 24 digital |
$1239 |
PXI-6521 |
16 digital (24 V logic) |
$715 |
PCIe-6321 |
16 analog, 24 digital |
$746 |
USB-6001 |
8 analog, 13 digital |
$220 |
If you’re using the NI-DAQmx plugin alongside the Neuropixels PXI module, we recommend using a PXI-compatible DAQ in the same chassis as the Neuropixels PXI basestation.
Tip
All of these devices (with the exception of PXI-6133) are known to experience “signal ghosting” if unused analog input channels are not grounded. Grounding at least one positive terminal of an unused analog input channel can reduce ghosting by ~99% of the highest amplitude active channel.
Connecting to your NIDAQ hardware#
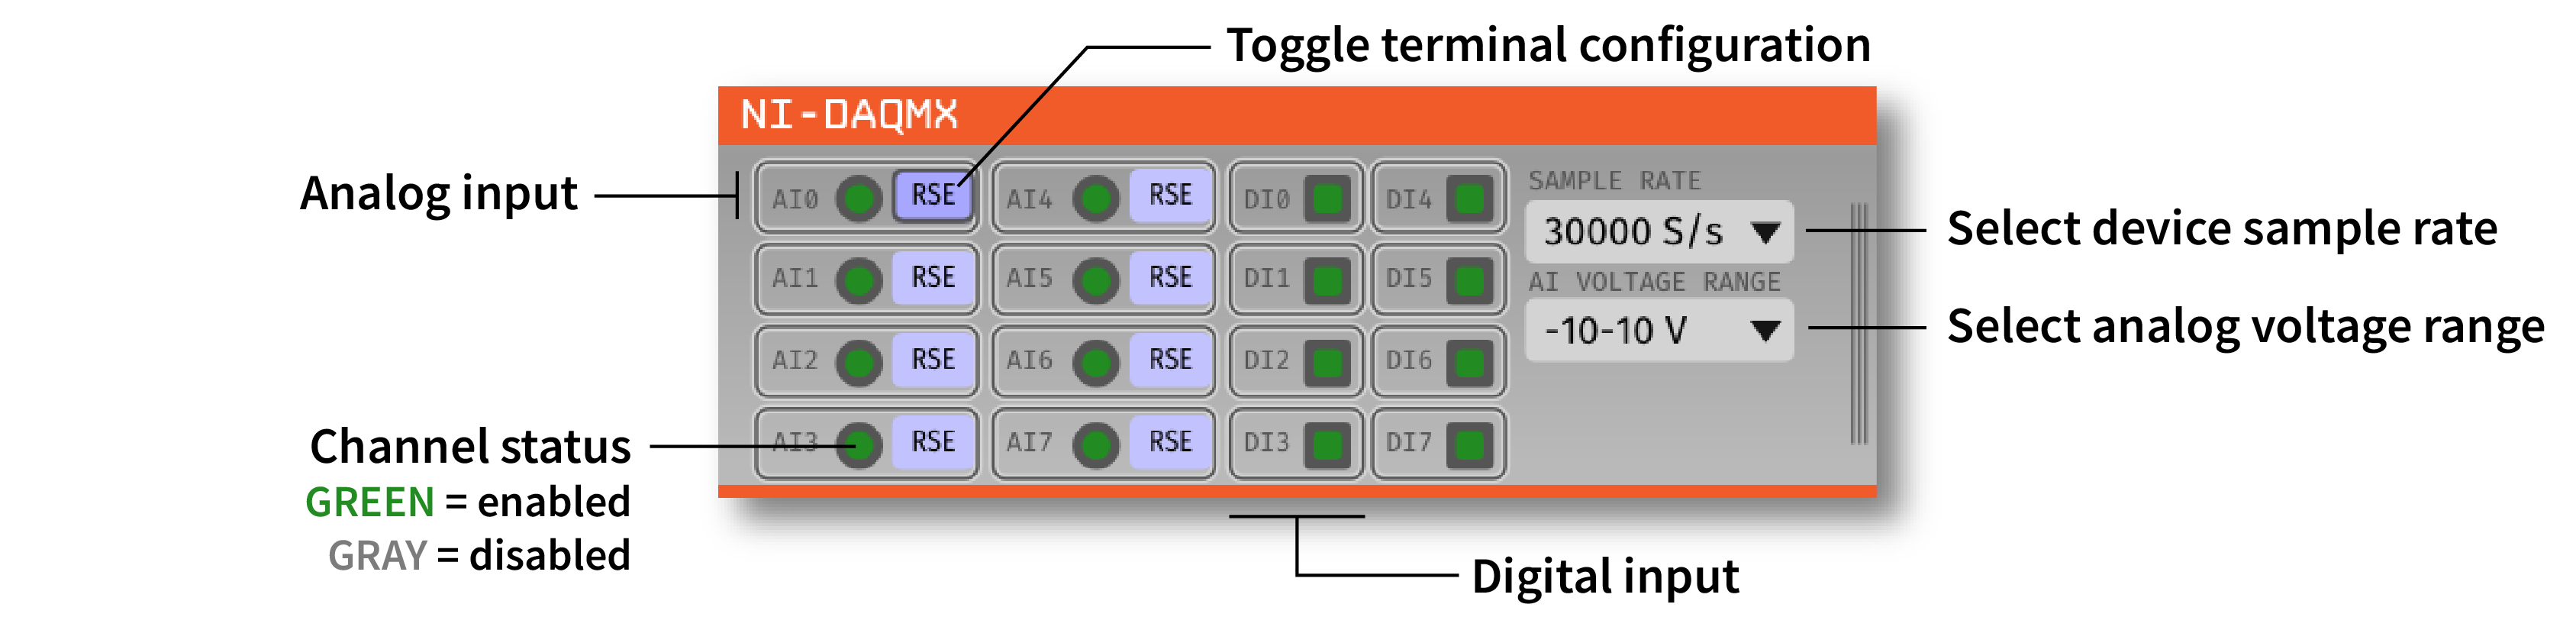
When inserting the NI-DAQmx plugin from the Processor List into the Editor Viewport, the plugin automatically checks for all connected NI devices. If multiple devices are found, all detected devices will be listed in the Device pull-down menu. The plugin only searches for devices when initially is inserted into the EditorViewport. If a new device is connected after the plugin is inserted, you will need to remove and drop a new NI-DAQmx plugin to select the new device.
The editor will automatically generate control buttons for each analog and digital input available on the selected NI device. Each analog channel contains a channel status toggle button as well as a terminal configuration toggle button. The channel status toggle button is set to on (green) by default for all channels and is intended to enable/disable channels on the fly. Toggling an enabled channel to off (gray) will simply ‘zero-out’ the data coming in on that channel.
The editor defaults to 8 analog and 8 digital channels which is common across most NI devices. If your device supports more channels, you can change the number of channels included in the plugin by using the Device configuration button directly above the Device pull-down menu. This will open the popover menu shown below:
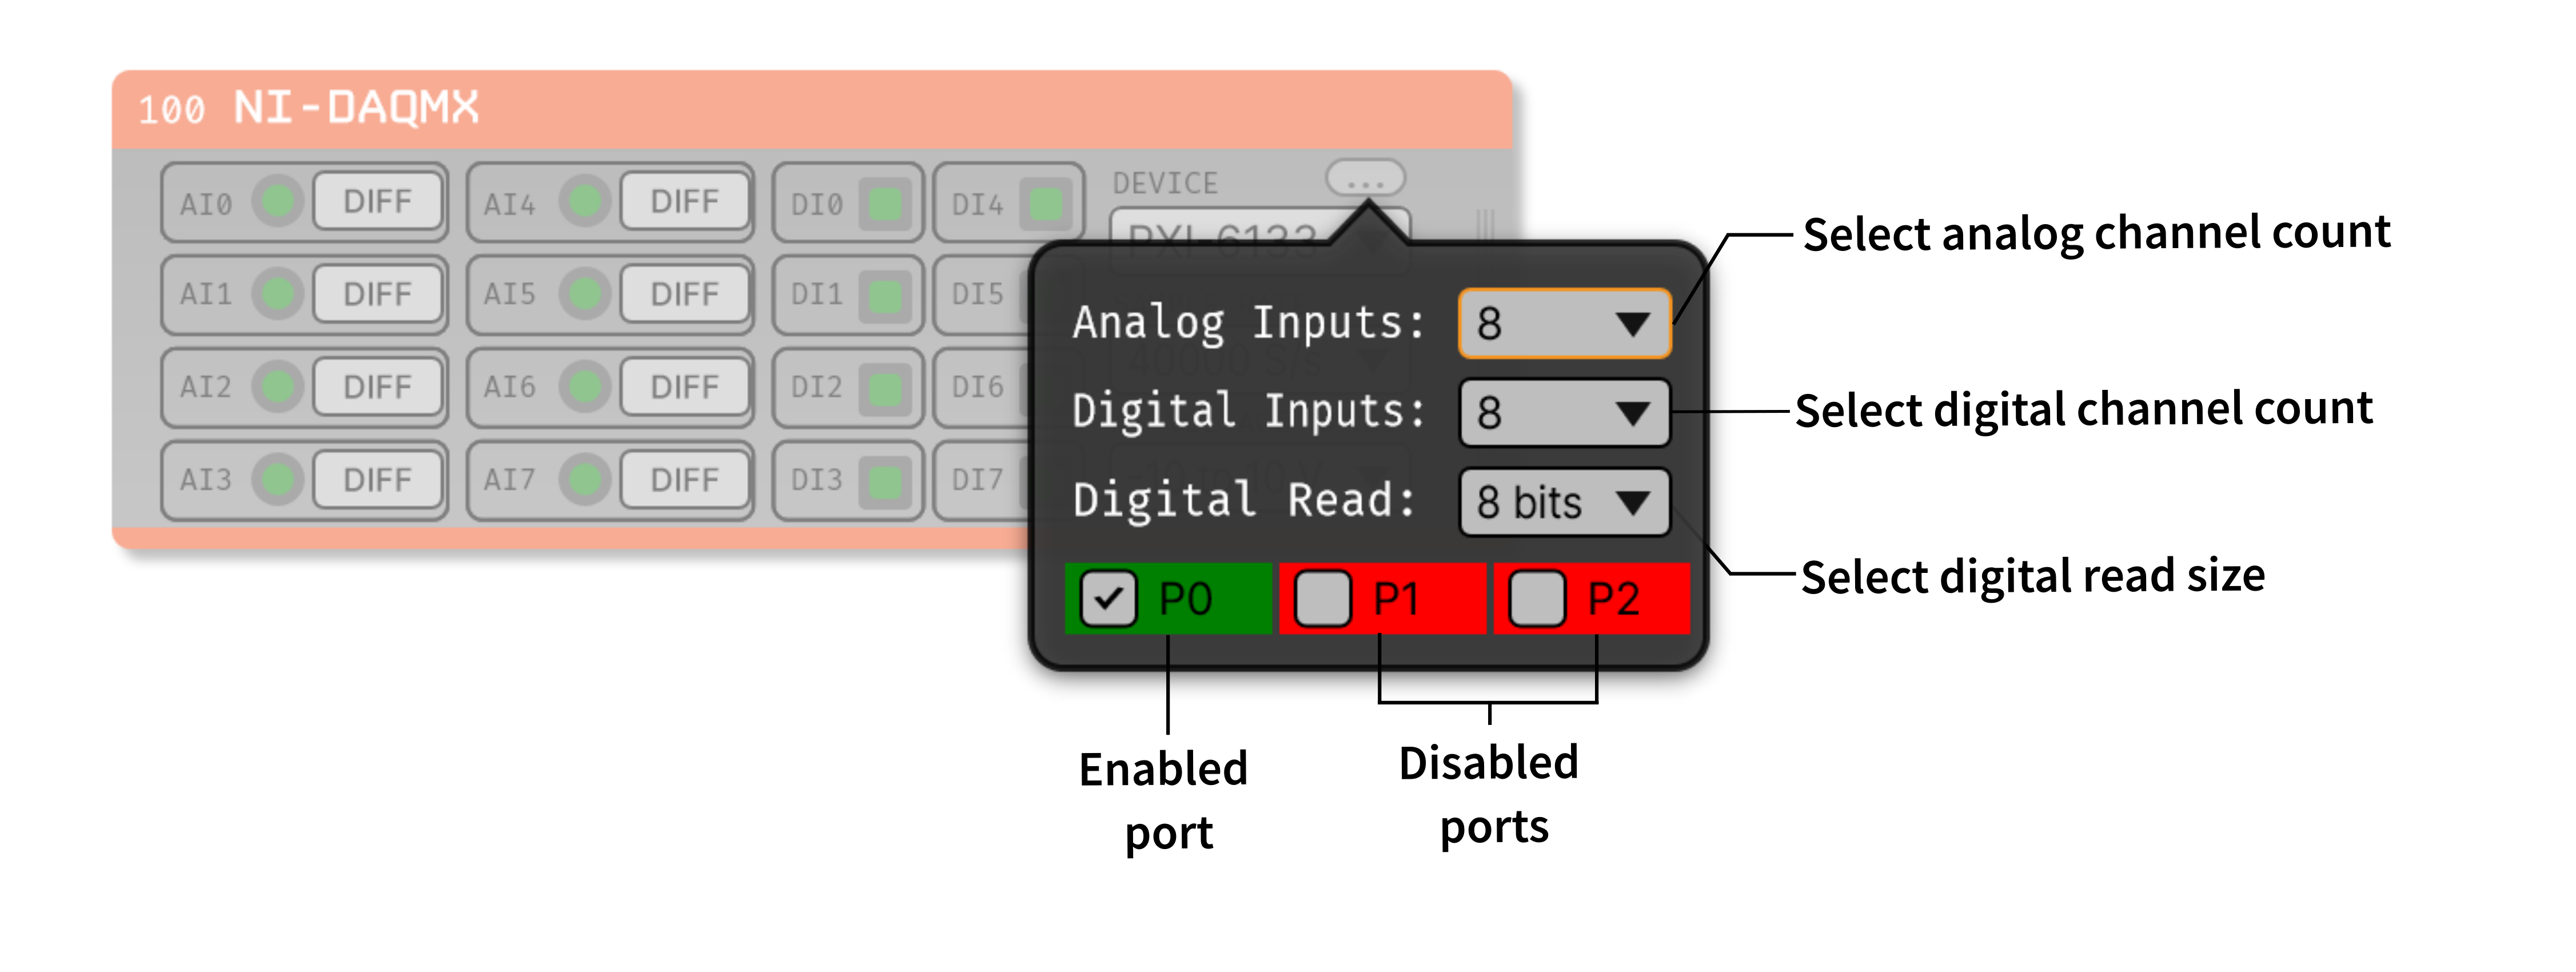
In the above menu, in addition to setting the number of analog and digital channels, you can configure the digital read size to be 8, 16, or 32 bits, depending on what is supported by your NI device. Additionally you can configure which digital ports to be enabled as input. This is useful if you have a NI device with more than 8 digital channels, but you may want to use other ports for output. A NIDAQ Output plugin will be available soon!
Each analog channel also contains a terminal configuration toggle specific to the device connected. Possible terminal device configurations are RSE (Referenced Single-Ended), NRSE (Non-Referenced Single-Ended), DIFF (Differential), and PDIF (Pseudo-Differential). The terminal configuration toggle setting in the plugin should match the configuration in your experimental setup. Since most NI devices cannot infer the terminal configuration electronically, it is up to the user to ensure the module configuration matches the experimental setup prior to acquiring and recording data. An inconsistent terminal configuration can affect the amplitude and voltage offset of the incoming data.
Each digital channel also contains a channel status toggle button. Disabling digital channels is particularly useful when a digital input line is constantly high or a digital line is not used at all.
On the right side of the plugin, pull-down menus are provided for selecting the sample rate and voltage range. These settings apply universally to all analog input channels and cannot be adjusted on a per-channel basis. The plugin defaults to the highest sample rate and the largest voltage range available on the device. Sample rate and voltage range selection are both disabled during data acquisition and recording.
Offline Synchronization#
The NI-DAQmx module has its own sample clock, even if it’s in the same PXI chassis as other hardware (e.g. a Neuropixels basestation). Therefore, it needs to be treated as a separate device when performing offline synchronization.
To align timestamps across devices, one device has to be treated as the “master” clock, and all other sets of timestamps must be scaled and shifted to match this clock. This requires that a digital sync line is physically connected across all devices.
While it’s possible to use one of the NI devices (or a Neuropixels PXI basestation) to generate the sync pulses, we recommend using an Arduino running the sync-barcodes program, which generates unique temporal barcode patterns every 30 s. This will allow you to align sample clocks unambiguously, even if your devices are stopped and started at different times.
To perform the offline alignment, you’ll need to identify the first and last shared sync pulse in the recording. The temporal offset between the start of the first sync pulses defines the shift between any device and the master clock. Once you know this, you can calculate the expected interval between the first and last sync pulse (given the expected sample rate of a device). The ratio of the actual interval to the expected interval defines the scaling factor for that device.
Then, each non-master clock can be transformed by the following equation (in Matlab):
aligned_timestamps = scaling .* original_timestamps + shift;
The “aligned_timestamps” will now be aligned to the master clock, and are ready for further analysis.
Online Synchronization#
An Open Ephys Record Node can automatically synchronize data sources that share the same physical sync signal. Since each device acquires data asynchronously, a shared clock signal between two different devices will have different sample numbers for corresponding TTL events. A Record Node can designate one of these channels as the main ‘synchronization channel’ and scale the timestamps coming auxiliary devices to be in alignment with the main device.
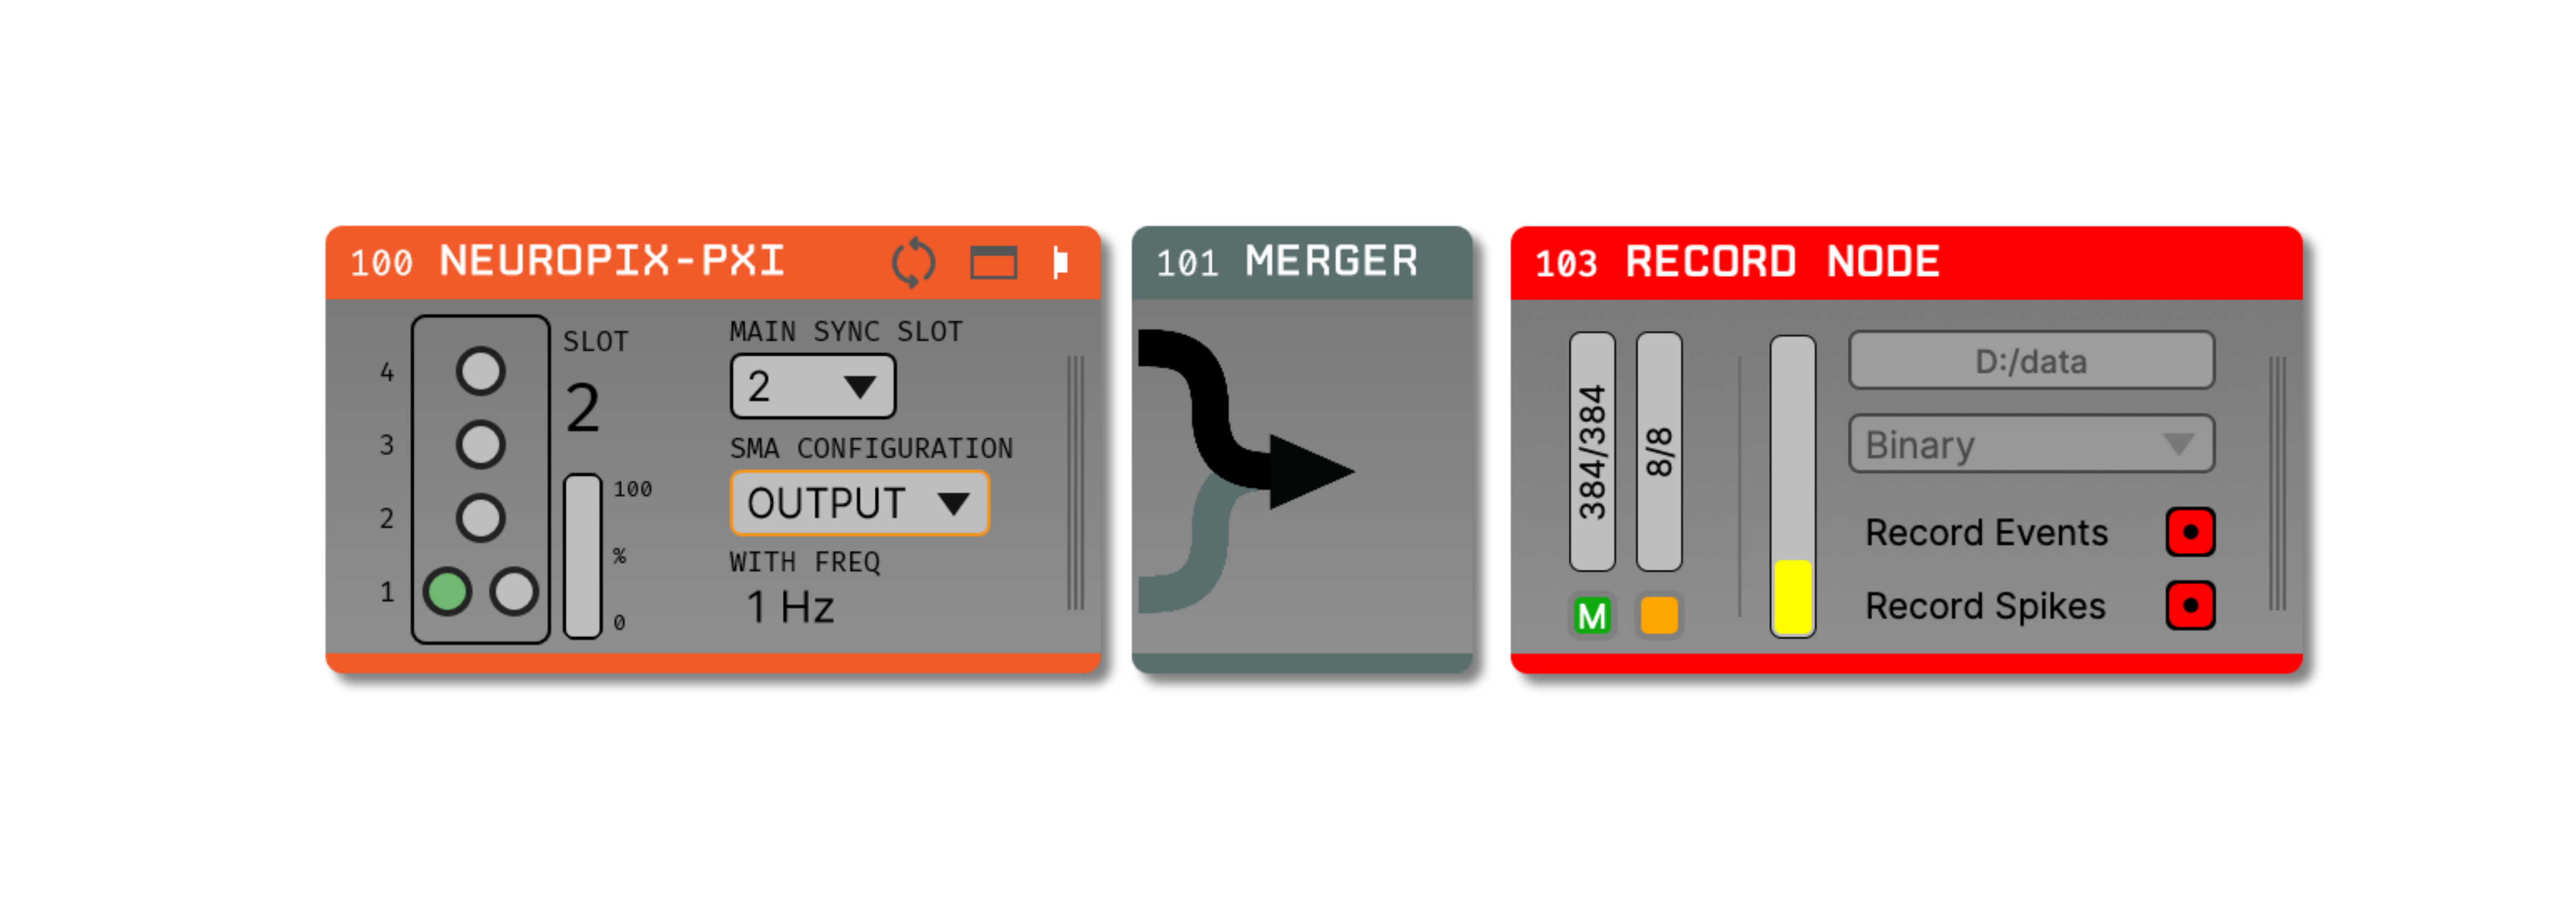
For Neuropixels probes, you can use the Neuropixels PXI as the main synchronization device by physically connecting the SMA output of the Neuropixels basestation to any digital input channel on the NIDAQ device.
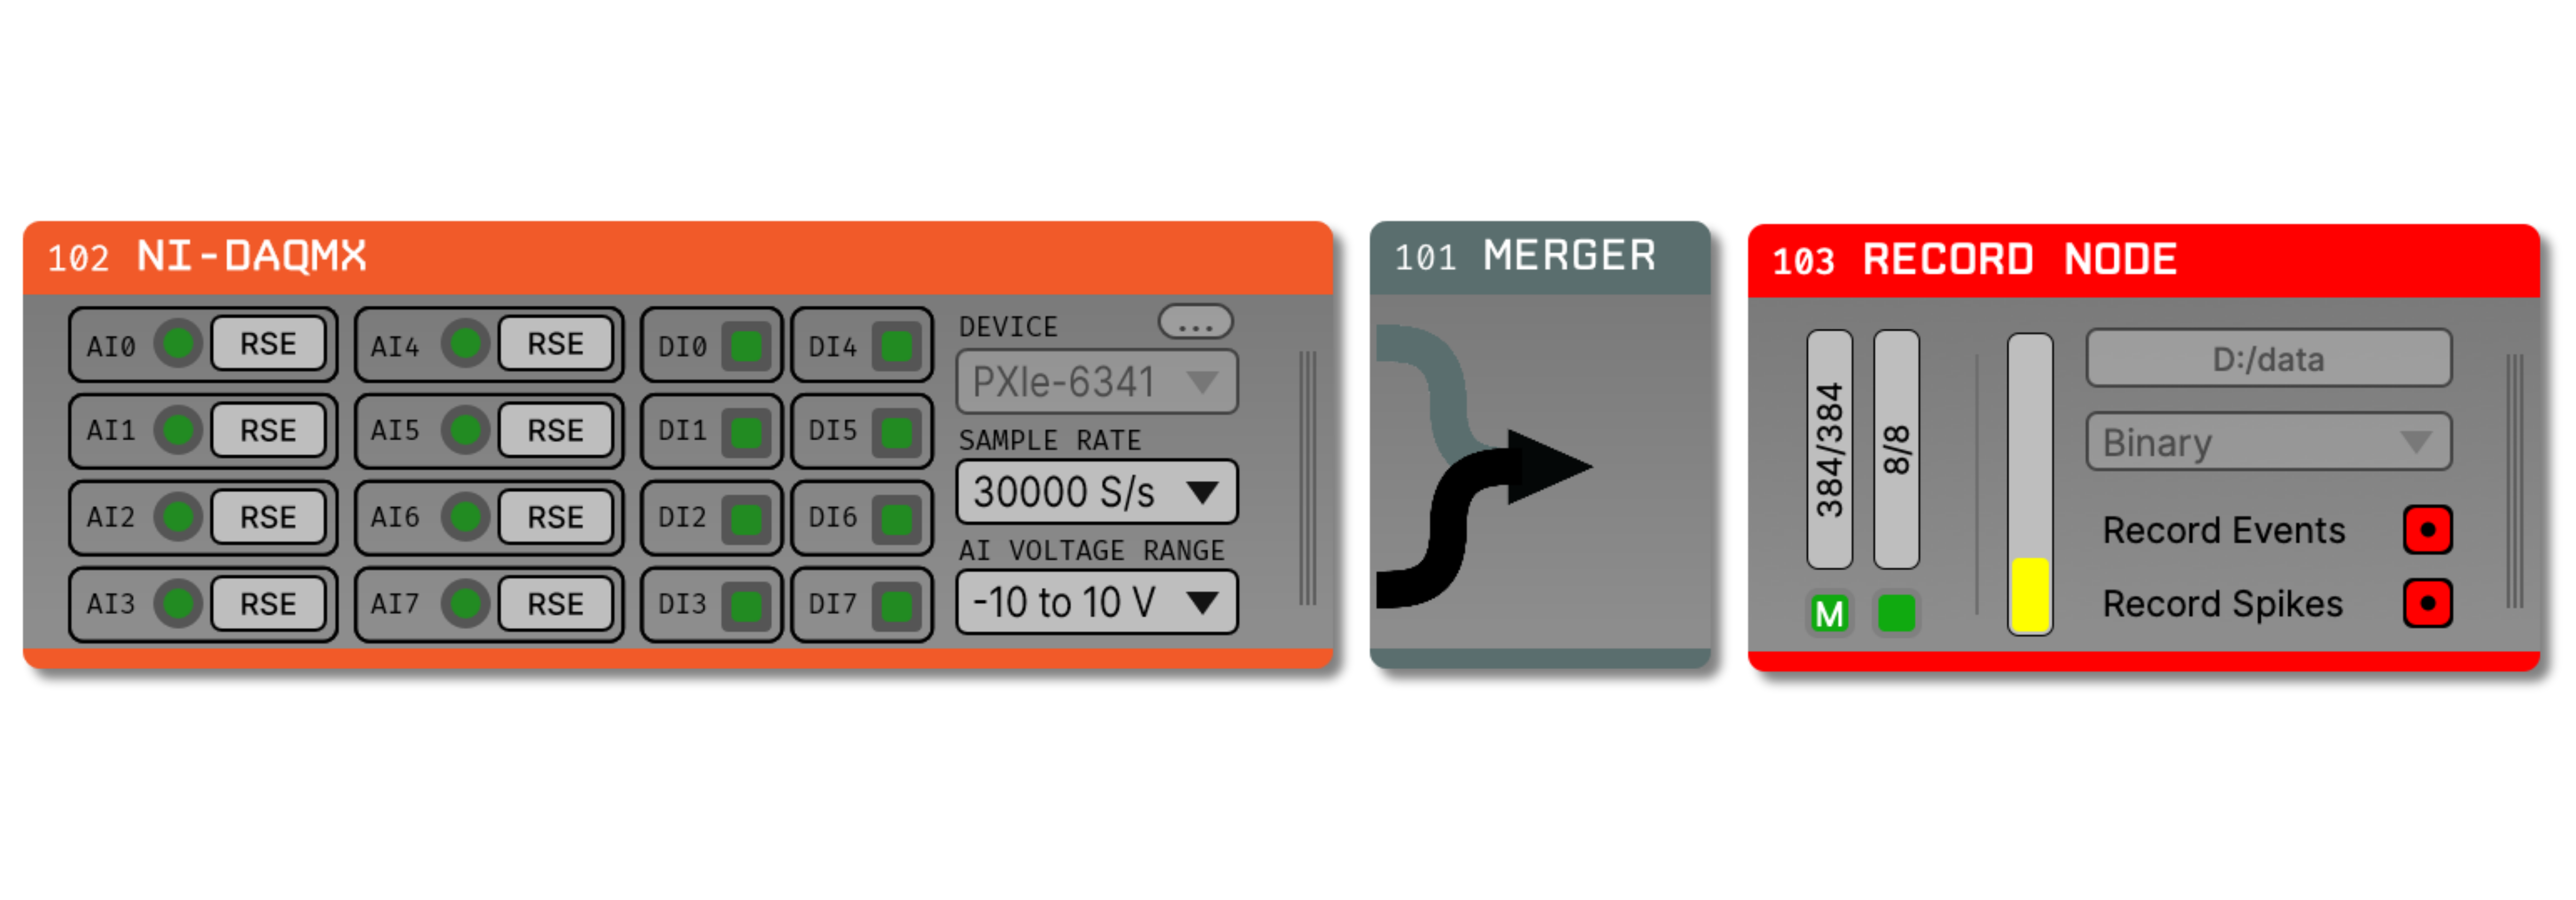
In Open Ephys, place a Merger before the Record Node and connect both the Neuropixels PXI plugin and the NI-DAQmx plugin. The Record Node will show either one or two streams per Neuropixels probe (depending if the 2.5kHz LFP band is included by the probe model) and one stream for the NIDAQ device. Each streams’s sync channel monitor will turn green if the digital line on that stream is synchronized with any of the other streams coming into that Record Node.
Upon starting acquisition, the main sync channel monitor in the Record Node will turn green first. The remaining sync channel monitors will turn green as streams are synchronized with the main sync channel. It can take up to 10 seconds for the synchronizer to detect the synchronization signal across all streams to be synchronized.
Tip
For more information about recording and synchronization in Open Ephys, please see the Recording data page.
NIDAQ Device Comparison#
We have tested the following devices, in descending order of performance. In all of the below examples, a 5 volt, ~2 Hz square wave @50% duty cycle from an Arduino is used to demonstrate the analog and digital input behaviors you can expect to see using each device in Open Ephys.
If you have any additional devices available for testing, please let us know!
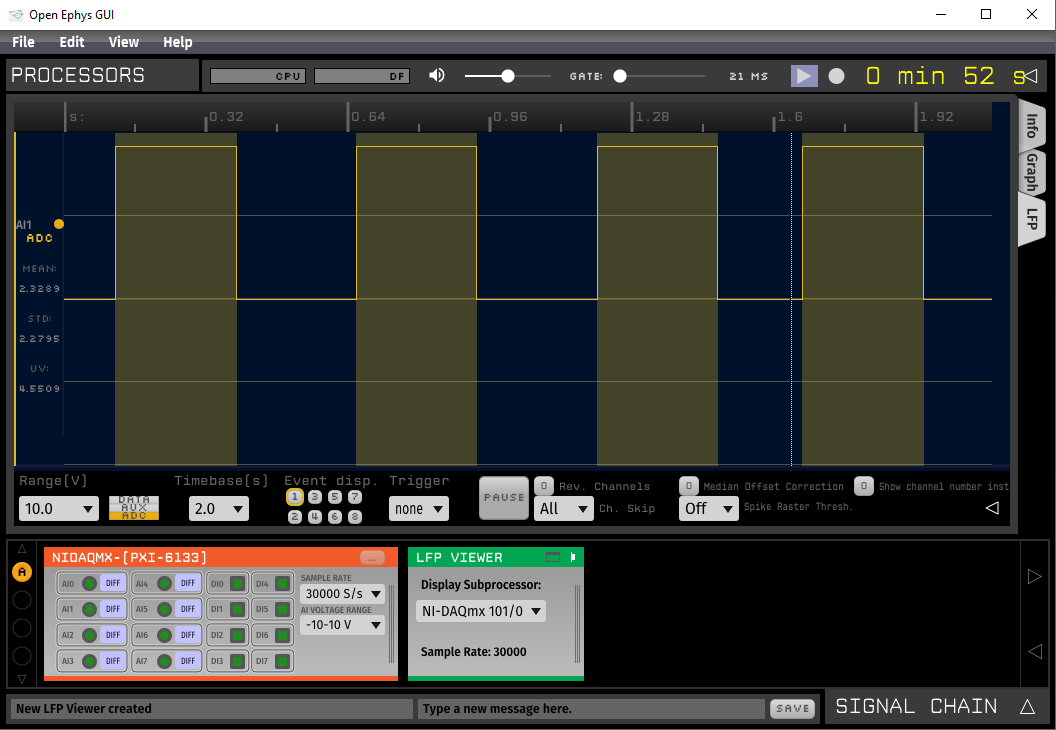
PXI-6133#
The PXI‑6133 supports simultaneous-sampling, which means the analog and digital channels are guaranteed to be sampled simultaneously in time and synchronized with each other before they reach the GUI. Passing the square wave test signal to both the first analog and first digital input on the card shows that both signals are synchronized:
Note
The 6133 takes a few (3-5) seconds to initialize after the acquisition button has been pressed; therefore, there will be a delay before data starts to appear in the LFP Viewer.
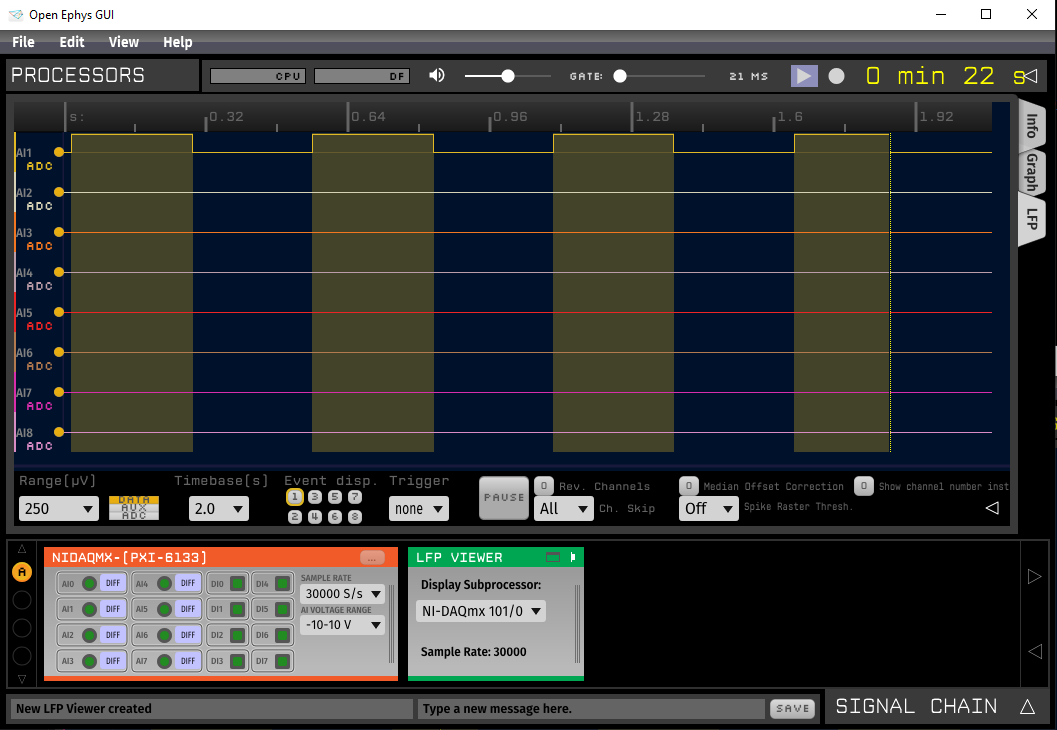
Furthermore, the analog input channels on the 6133 are well-isolated and there is no signal cross-talk on any of the unused analog input channels:
Tip
The voltage on the unused channels may float at a constant non-zero value if left open. It is good practice to either ground or short the non-used analog inputs to avoid this.
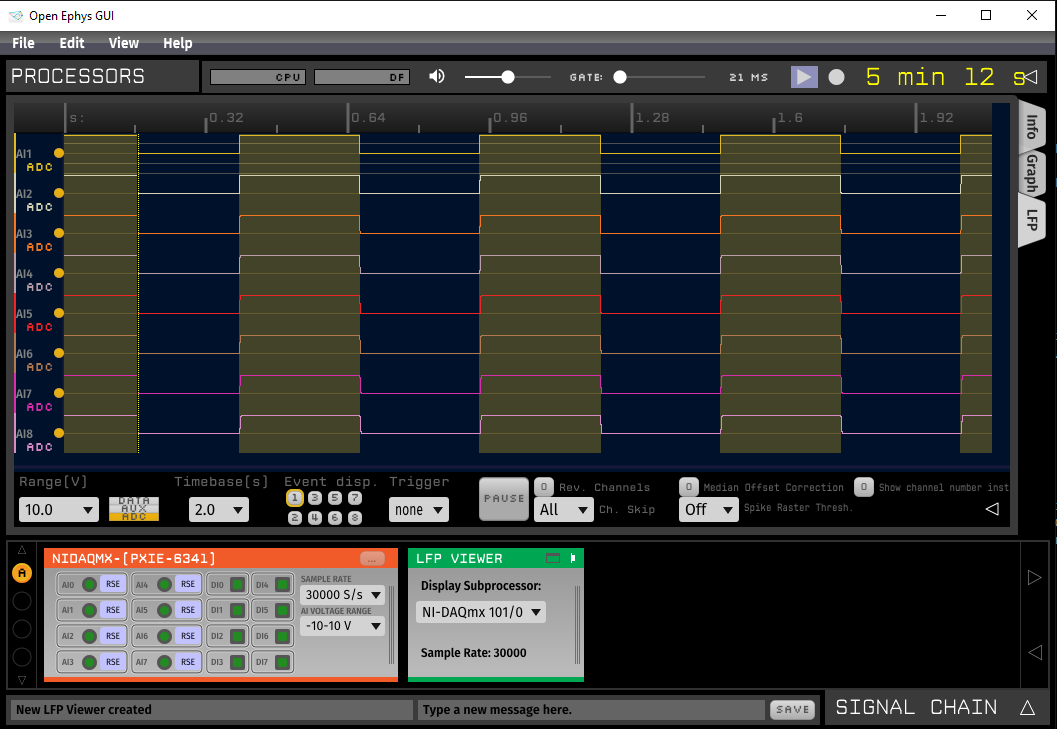
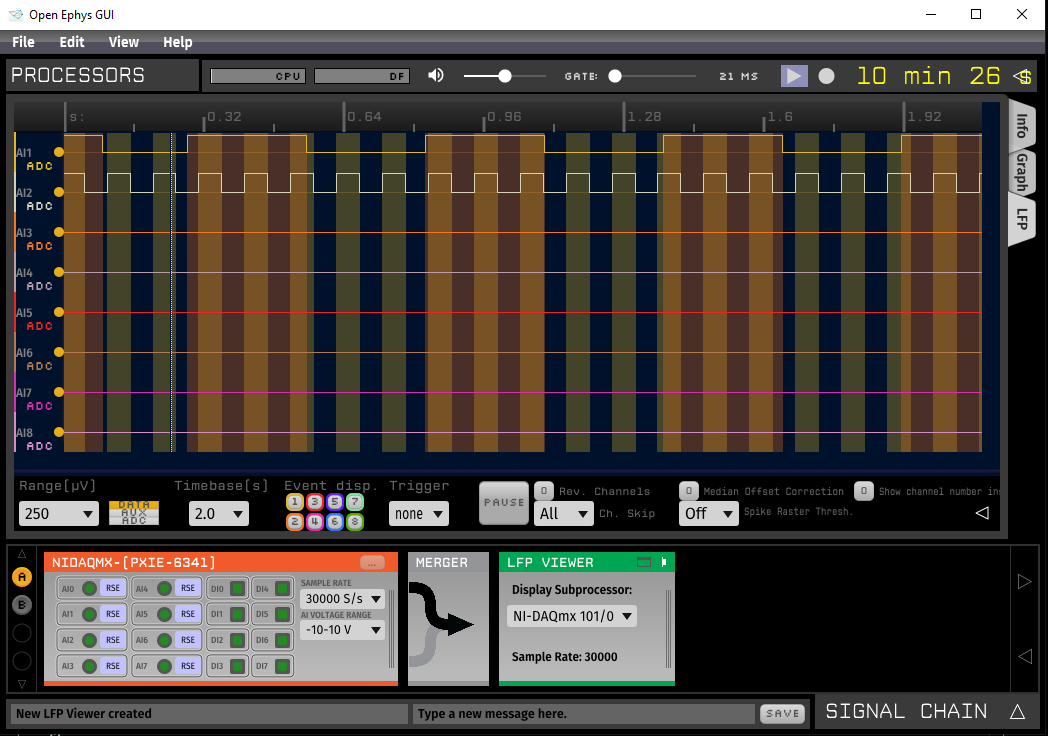
PXIe-6341#
The PXIe-6341 performs almost as well as the 6133, however, there is cross-talk across unused channels when applying the same test signal as above. That is, if a signal is physically connected to only the first analog input channel, a ‘ghost’ of the signal will appear across all of the open analog input channels as shown below:
However, if a 10Hz square wave is added to the second analog input and to the second digital input, there is no interference between the new signal and the original test signal on either the analog or digital channels:
PXI-6521#
The 6521 is the least expensive PXI DAQ board available from NI. However, it only supports digital input channels that swing higher than +11V in order to get a TTL signal. Nonetheless, this card can still be a cheap(er) alternative for experiments that may only require digital channels alongside neural data. If you are using a 5V microcontroller in your experiments, you will need to boost your digital lines from 5V to something higher than 11V. A potential solution here is to use a 12V power source and a transistor inverter circuit.
PCIe-6321#
The PCIe-6321 card does not require a PXI chassis and can be connected directly to the PCIe slot of a PC motherboard. This card exhibits the same behavior with the test signal as the PXI-6341, however, there is some overshooting observed at steep signal transition points. Smooth analog signals will not exhibit this behavior.

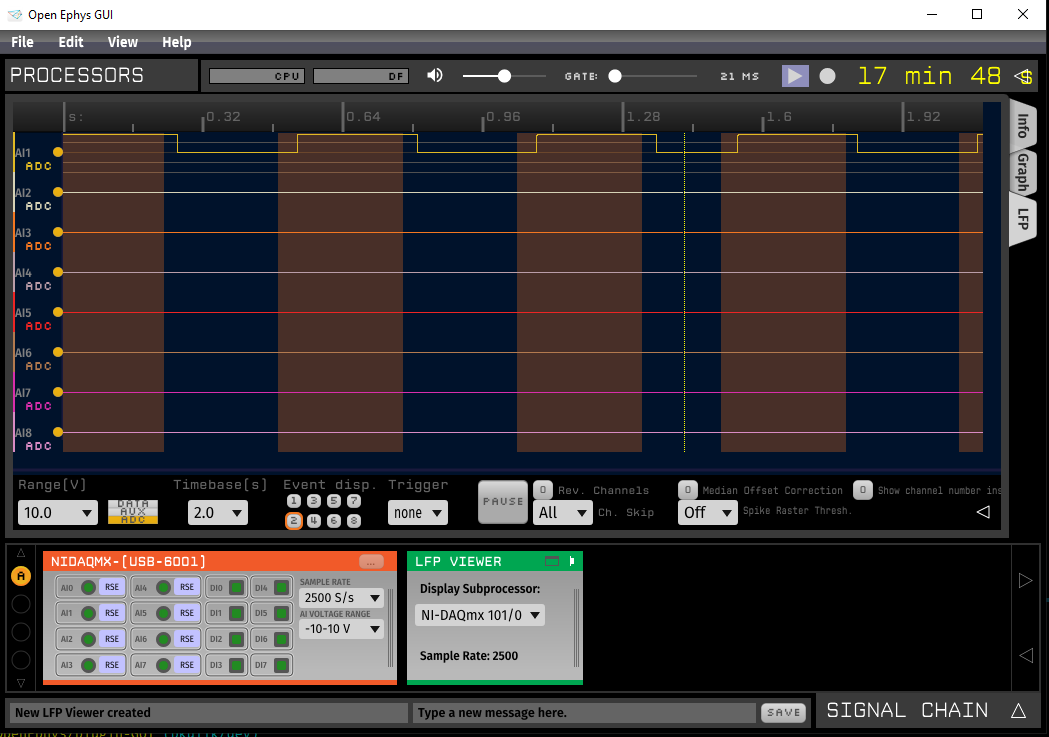
USB-6001#
Applying the test signal to the first analog and second digital input of the USB 6001 results in the digital channels going high significantly before the analog channels. The USB devices also inherit the ghosting and overshooting issues mentioned in previous devices.
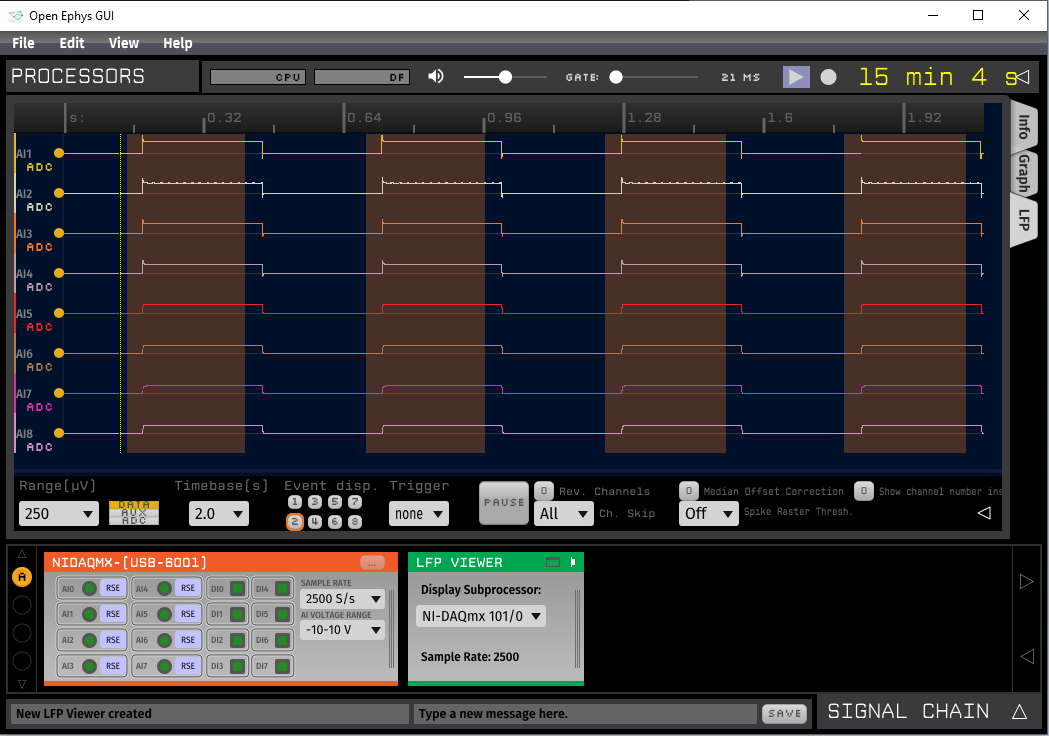
The delay between the observed analog and digital inputs is not guaranteed to be constant. By grounding any unused analog channels, the USB-6001 can still achieve a clean and isolated signal on its analog channels: